Wrist Pain Relief
& Carpal Tunnel Relief
Many others before you have benefited from the videos on this website, so please give them a try. They are worth your time.
The 3 videos for Wrist Pain Relief are below on this page.
Go directly to any video on this page by clicking these links:
Intro,
Video 1,
Video 2,
Video 3 .
Pain Relief Success Story, From Amy:
"Just wanted to write a quick thank you note! I am in the middle of recording a new record of my music and my wrists have been in a ton of pain after playing a lot of piano. I was feeling a lot of pain and very overwhelmed when I found your site. After only ten or fifteen minutes of self massage, the pain is nearly gone! You are amazing. Thank you :)" Amy, United States
You can do it too!
Click directly to any pain relief video on this page:
Intro, Video 1, Video 2, Video 3 .
*Please Watch This Short Video First. Thanks.
Please visit the techniques page now, if you haven't already.
You may also want to visit the homepage where I describe…in detail…the 3 Simple Steps and the 4 Basic Facts about your body that make it possible for you to provide your own joint pain relief.
Detailed Instructions For
Wrist Pain Relief & Carpal Tunnel Relief
Intro, Video 1, Video 2, Video 3 .
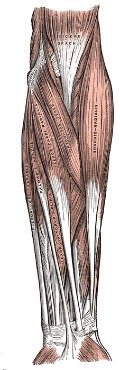
Wrist pain relief can often be shockingly simple if you are shown the correct techniques. The most likely key to relieving wrist joint pain and/or carpal tunnel syndrome is usually in the bellies of the muscles in your forearm, which we will deal with here in Step 1.
The work on your forearm that I show in the video is critically important. If you don't feel you are strong enough to work on your own forearm, or would just like a bit more help, please visit my Wrist Pain Relief Tool - How To Build Your Own (click here) page. It's a simple effective tool that you can build yourself.
Here's what we're going to do:
A. Forearm Release With Thumb -
All the tendons from your forearm muscles run through your wrist and connect to your hand and fingers. If the big bellies of these forearm muscles are tight then they can be pulling too much on the tendons and create the wrist pain you feel. So we've got to loosen these tight muscles.
Take your thumb from your opposite hand and press it into the muscle tissue in your forearm while your arm rests in your lap with your palm facing toward the ceiling. Notice any tender spots, and notice if the entire forearm is tight, which is possible.
Even if you have strong forearms you should be able to press into the muscles and they should NOT be tender. Tender means tight, and tight muscles mean they're probably playing a part in making your wrist hurt. Ideally, muscles are strong and flexible, not tight and tender.
Now, we'll use the press-hold-move technique. Begin opening and closing your hand continuously while……at the same time……you are pressing with your thumb into the tender spots in your forearm muscles.
You will feel the tight muscles moving under your thumb as they do their job of opening and closing your hand. Take a break when your thumb needs a rest from pushing.
Notice how much wrist pain relief has occurred from this one technique. Repeat this technique one more time before moving on.
B. Forearm Release With Opposite Forearm -
I love this technique! It has served me well for many years when I work on my own forearms. Sometimes you need more pressure than just your thumb can provide to release the muscles in your forearm.
With the palm of your hand facing the ceiling, lay your forearm on a flat, stable, but cushioned surface. Laying a towel on a kitchen table, chair, stool, or bench is usually fine.
Now we'll use the press-hold-move technique again. Take your opposite forearm and using about 2 to 3 inches of the flat boney surface just below your elbow, lean over your forearm that is now resting on the table and use your bodyweight to press into the tight tissue in your other forearm……while you open and close the hand on the wrist the hurts.
Pick one tender spot at a time. Then press, hold and release......press, hold and release as you open and close your hand. Do this for a couple minutes, take your time. Then take a break.
Notice how much wrist pain relief has occurred from this one technique. Repeat this technique one more time before moving on.
C. Top of Forearm Release With Fingertips -
Now we're going to release the muscles on the "top" side of your forearm (extensor muscles). Place your hand on your lap palm down. The part of your forearm facing the ceiling is what we're calling the "top" of your forearm for this exercise.
Take your fingertips from your opposite hand and press into the muscle tissue on the top of your forearm while you flex your hand back toward your elbow. Notice any tender spots in the tissue on the top of your forearm (anywhere between the two bones that make up your forearm).
Now, we'll use the press-hold-move technique. Press on one spot at a time as you flex your wrist back and forth. Take a break after a minute or two.
Notice how much wrist pain relief has occurred from this one technique. Repeat this technique one more time before moving on.
D. Top of Forearm Release With Point of Elbow -
Sometimes you need more pressure than just your fingertips can provide to release the muscles in the top of your forearm.
We'll still be using the press-hold-move technique.
With the palm of your hand facing down, lay your forearm on a flat, stable, but cushioned surface. Laying a towel on a kitchen table, chair, stool, or bench is usually fine.
Now take your opposite forearm and using the point of your elbow, press into your forearm resting on the table and use your bodyweight to press into the tight tissue in your forearm while you flex your wrist back and forth.
Pick one tender spot at a time. Then press and release, press and release as you flex your wrist back and forth. Do this for a couple minutes, take your time. Then take a break.
Notice if and how much wrist pain relief has occurred.
Repeat this technique one more time before moving on.
Click directly to any pain relief video on this page:
Intro,
Video 1,
Video 2,
Video 3 .
Here's what you're going to do:
A. - Underside of Collarbone -
Why the underside of your collarbone for wrist pain relief? Well, there is a large group of nerves called your brachial plexus that runs across your upper chest and down to your wrist that can definitely be negatively affected by tight tissue on the underside of your collarbone. That's why we want to make sure that the tissue is free.
First, take you fingertips and press them into all the tissue on the underside of your collarbone from the edge of your sternum all the way out to the edge of your shoulder.
Second, use the combination of the press-hold-move technique and the hand-on-hand technique to release any tight tissue you may find.
Third, add in the press-pull-release technique with the hand-on-hand technique in any areas that are a bit stubborn.
Was there much wrist pain relief from releasing the underside of your collarbone?
B. Upper Back -
The press-hold-move technique and the tennis-ball-press technique are the best thing I've found to release your upper back.
Use your bodyweight to press into the tennis ball to discover any tight tissue in your upper back area. Once you find a good spot, press as much of your bodyweight into the spot as you can comfortably relax into, and then move your body (in this area moving your arm is probably the best option) to get the tissue under the ball to move and thereby release.
You can spend a lot of time releasing your upper back, and it will only help everything from your neck to your fingertips work better. So go for it!
Did releasing your upper back help create any wrist pain relief?
Click directly to any pain relief video on this page:
Intro,
Video 1,
Video 2,
Video 3 .
You've already restored a lot of joint muscle balance with the work you did in Step 1, so Step 3 just deals with the few remaining muscles that could be causing your wrist joint pain.
So here's what we're going to do:
A. Palm of Hand Release -
Press-hold-move technique with your thumb on the palm of your opposite hand is a very effective technique.
Take your thumb from your non-painful hand and place it in the center of the palm of the hand with the wrist pain. While holding your thumb in place and fingertips braced against the back of the hand with wrist pain….so now you are able to "pinch" the palm of your hand between your thumb and fingers.
Gently pinch the tissue in your palm and notice any tender tissue
Now, press firmly on any tender spots while opening and closing your hand. For most areas of your palm you can open and close just your fingers and you'll feel the tissue move under your thumb as you do it. But for the muscles in your palm that operate your thumb you may have to play around with the position of your working hand to appropriately "pinch" the muscles that operate your thumb.
Take your time. Press on the tissue while moving your fingers on the hand with the wrist pain. Then move to another spot for a while. Then come back to the spots you've already worked with and you'll find they're more free from the work you did in other areas.
Notice if one particular tender spot triggers or relieves your wrist pain and focus on those spots.
Repeat Step 3 again before assessing it's effectiveness. Most people's palms need a lot of work to totally release, so just do a little bit at a time if that works better for you.
Notice how much wrist pain relief Step 3 achieved for you for future reference.
Self-Assessment For
Wrist Pain Relief
Is there still some pain remaining?
Did you notice one technique that seemed to help the most?
Was there a particular area where the tissue was very tight and still needs more work?
If your pain is not completely gone, when are you planning to do some more work on yourself? Schedule a time now if you can.
Stick with it, be patient and persistent, and soon you'll be pain free.
Return from this Wrist Pain Relief page to the
Do-It-Yourself Joint Pain Relief Homepage
This Free Pain Relief Website
By Clicking On Your Favorite Icon Below:
Add Gary Crowley to your Google Plus Circles -
Google+ (click here)
Copyright © 2011 - 2022 DiyJointPainRelief.com


