Sacroiliac Joint Pain Relief
Just follow along with the videos below.
Go directly to any Sacroiliac Joint Pain Relief video by clicking these links:
Intro,
Video 1,
Video 2,
Video 3 .
Pain Relief Success Story, From Lori:
"I just needed to tell you how grateful I am for your instructions on sacroiliac joint pain relief...Over the past year I have suffered from sacroiliac joint pain. I have been through 2 unsuccessful rounds of physical therapy, 3 rounds of steroid injections and 6 weeks of chiropractic care and thousands of dollars.... Nothing has helped.
I looked online yesterday and your website came up first on google. I tried your techniques and I can't believe the relief I felt immediately. You are my hero. I am so grateful that you are willing to post information like this for people like me who are at their rope's end. Thank you so much for your help." Lori, United States
You can do it too!
Click directly to any sacroiliac joint pain relief video on this page:
Intro, Video 1, Video 2, Video 3 .
*Please Watch This Short Video First. Thanks.
Please visit the techniques page now, if you haven't already.
On the homepage I describe…in detail…the 3 Simple Steps and the 4 Basic Facts about your body that make it possible for you to provide your own joint pain relief.
Detailed Instructions For
Sacroiliac Joint Pain Relief
Click directly to any sacroiliac joint pain relief video on this page:
Intro,
Video 1,
Video 2,
Video 3 .
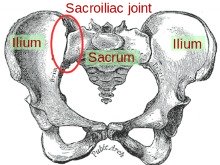
STEP 1 - Sacroiliac Joint Pain Relief
Your sacroiliac joint is often negatively affected by two main muscles.
The first is your "vastus lateralis muscle," which is your outer most thigh muscle. It's rather difficult to get at with stretching, so it can be tight even in folks who are avid stretchers.
The next muscle (and its tendon) is call your tensor fasciae latae muscle. It's tendon is called your "I T Band" (iliotibial band) .
Both of these two muscles will yank your pelvic bones out of position when they are tight and can negatively affect the SI Joint.
Now let's get to work:
A. Vastus Lateralis (lateral thigh muscle) -
In a sitting postion, take the fingertips of one hand and place them about midway down on the outermost portion of your thigh.
Now if you place your fingertips or palm from your other hand on top of the fingertips already on your thigh, this is the hand-on-hand technique. You'll find that you can apply much more downward pressure on the tissue you will be working on using this simple technique.
Now we'll investigate to find tight tissue that needs to be released. Press your fingertips into the outer third of your thigh and notice the spots that are painful when you press on them. Tissue that is painful when you press on it is tight tissue and it needs to be released.
Once you find a painful/tender spot you'll want perform the press-pull-release technique along with the hand-on-hand technique to work with the tissue until it let's go.
When you've gotten some good release on one leg, go work on the other leg for a while. It's important to do both sides of your body. Believe it or not, sometimes it's the vastus lateralis from the opposite side of your body from where your pain is that is causing the SI Joint problems.
Notice how much sacroiliac joint pain relief this one technique provides for future reference.
B. Side of Leg Release -
Using the identical techniques to the ones described above in Step A, we're going to release the side of your leg (your "IT Band" and the muscle at the top of you IT Band called your Tensor Fascia Latae, aka your "TFL") by using the press-pull-release technique and the hand-on-hand technique
I usually do these techniques while sitting, but some people like to lie on their side when releasing this muscle. Experiment and see what works best for you.
As you perform these techniques, just find the painful/tender spots in your tissue to work on. Work on those tight spots for 10, 20, or 30 seconds and get what release you can. Then find other tender spots to work on. Then revisit any of the stubborn spots and you may notice that now they release much more easily.
Lastly, your TFL (tensor fasciae latae) muscle is located between the very top of your femur and the very top of your side hip bone. Sometimes this little muscle is very important in releasing SI Joint Pain, so don't skip it. If it's tight and you can get it released with the press-hold-move technique then that's great. However, sometimes you may need to do the tennis-ball-press technique while lying on a tennis ball to get it too release. Believe me, it's worth the effort to get it released if this happens to be tight on you.
Notice how much sacroiliac joint pain relief each of these techniques provide.
Click directly to any sacroiliac joint pain relief video on this page:
Intro,
Video 1,
Video 2,
Video 3 .
STEP 2 - Sacroiliac Joint Pain Relief
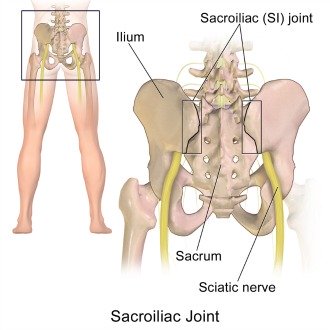
The second group of muscles that could be causing your sacroiliac joint pain are actually on the "front of your back." One muscle called your iliacus wraps the inside of your pelvis. The second muscle called you psoas (the filet mignon in a cow!) runs along each side of your spine.
Here's what we're going to do:
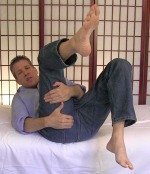
A. Inner Hip Muscle Release -
The muscle we are going to release is called your iliacus muscle. It wraps around the inside surface of your hip bone. But it's still just muscles tissue like the muscle tissue in your thigh or your bicep, so it will release when you work on just like those muscles.
We'll be using the press-pull-release technique and the hand-on-hand technique on any tight tissue we find just like we did in the last video.
Lie on your back on a comfortable surface. Bend your knees so that your feet are flat on the floor and your back is resting comfortably on the floor. Find the outer and up edge of your hip bone and press your fingertips into your belly about one inch toward your belly button. Press in and down toward your hip bone until you press into the muscle tissue of your iliacus. Notice any tender spots in the muscle tissue of your iliacus and do the press-pull release on any tight tissue. You can also incorporate the press-hold-move technique by rocking your pelvis back and forth while press on the tissue.
Crossing one leg over the other while you work on this tissue is another way to access the muscle tissue from different angles, so feel free to investigate on your own.
Now do all of the above on your iliacus on the other side of your body.
Notice how much sacroiliac joint pain relief you obtain from this specific hip release. This one muscle can often be the sole cause of your pain!
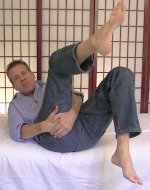
B. Front Side of Spine Release
Releasing your psoas muscle is next. It's a big round rope of a muscle. It runs down both sides of your spine from your middle back and attaches to the inside of your femur. It's like a big bungee cord that initiates the lifting of your leg.
Assume the same position as you were in when we released your iliacus. Lie on your back, feet flat on the floor, knees bent.
Take your fingertips and press into your belly about an inch to the side of your belly button on one side of your abdomen. Relax your abdominal muscles and press firmly, but gently, into your belly toward the floor. If you press your feet into the floor while you do this it helps keep your abdomen relaxed.
As you press your feet into the floor tuck your tailbone up toward the ceiling and then allow it to relax back to the floor. As you do this motion see if you can feel your psaos muscle moving under your fingertips. You can do it.
Now you'll want to do the press-hold-move technique with the assistance of your other hand to do a unique hand-on-hand technique to get your psoas to release.
When you've completed one side, go do everything you just did on the opposite side of your body.
You should absolutely watch the video for this technique as a verbal description is very difficult for this technique.
Notice how much sacroilliac joint pain relief you experienced from doing this technique.
Click directly to any sacroiliac joint pain relief video on this page:
Intro,
Video 1,
Video 2,
Video 3 .
STEP 3 - Sacroiliac Joint Pain Relief
The third group of muscles that could be involved in causing your pain are in your hips. They attach to both your tailbone and hip bones. What follows are my odds on favorites for releasing your sacroiliac joint pain.
However, feel free to add the following stretches if you desire: Steps 3D (hip stretches), 3E (active hamstring stretch), and Step 2 (passive low back stretch) from the main Lower Back Pain Relief page. They can only help, so give them a try if you desire.
Here are the techniques:
A. Tennis Ball Hip Release-
As you may have guessed, we'll be using the tennis-ball-press technique to perform the press-hold-move technique…on BOTH HIPS.
All the muscles in your hips that attach to your hip bones or tailbone could be affecting your SI Joint, so we want to make sure they are all free.
Basically, sit on a stool, bench, chair or any other comfortable surface. Take a tennis ball and place it under one side of your butt and use your bodyweight to apply pressure to the tissue. Anywhere from the tissue at the bottom of your butt where it meets the back of your leg, all the way up to your hip bone at the border of your lower back, you want to make sure that tissue is not painful when you press the ball into it.
Once you find a spot put as much of your bodyweight into the painful spot as you can comfortably relax into and then move your leg in a way that makes the tissue move under the pressure of the ball. It may take a little bit of practice, but very quickly you'll get the hang of it.
You'll very quickly figure out how to get that tissue under the ball to move by the way you move your legs. Then you're just doing a press-hold-move technique with a tennis ball.
Once you've established good pressure on a tender spot, do your best to move your legs in a way that causes the muscle you are pressing on to function. Then repeat, repeat, repeat in all the tender spots in your hips.
Feel free to do each spot more than once, as you'll often get more release the 2nd or 3rd time you return to a tender spot.
Also, feel free to switch from one hip to the other and go back and forth. Sometimes releasing one side enables the other one to let go as well.
Notice how much sacro iliac joint pain relief this one technique provides for future reference.
B. Tailbone Release -
The tennis-ball-press technique to release any tight tissue on your tailbone is what we'll do next. Use your body weight to press the ball into your tissue and find any painful/tender spots. Now, while only applying as much pressure as you can relax into, do the press-hold-move technique with the tennis ball instead of your fingertips.
Notice how much sacro iliac joint pain relief this technique provides.
C. Manual Hamstring Release -
Lie on your back with your knees at your chest and reach around your thigh with one arm on each side of your leg and press your fingertips into the tissue where your hamstrings attach to the bottom of your hip bones (sitz bones). When your find any tender spots, press on tissue and move your leg so the tissue under your fingertips.
You can also supplement this technique with the active hamstring stretch which is demonstrated on Step 3E of the main lower back pain page (click here).
Notice how effective all of Step 3 has been.
Self-Assessment Of
Sacroiliac Joint Pain Relief
Which techniques gave you the most s i joint pain relief?
Was there one specific sacro iliac joint pain relief treatment that instantly relieved your pain?
Remember what worked best for you, so you can do that first next time your s i joint pain occurs.
Are you still experiencing some sacroiliac pain?
I want to encourage you to be a bit of an investigator. If you've gone through all the videos on this page, you are aware that there are many muscle groups that can play a role in creating your sacroiliac joint pain. Finding and releasing all the inappropriate tension in these muscle groups may not happen in one follow-along session with my videos.
Be an investigator for tight tissue and you'll be amazed at the results you can achieve. Sometimes you may think you've been through an entire area, but poking pressing or stretching in just a slightly different way may reveal some inappropriately tight tissue you missed the first, or second time you went over the area.
Keep up the good work. Be persistent, be patient and you'll most likely free yourself from pain.
More Sacroiliac Joint Pain
Relief Pages:
To visit the Exercises For Sacroiliac Joint Pain page (click here)
To visit the main Lower Back Pain Relief page (click here)
Return from this Sacroiliac Joint Pain Relief page to the
Do-It-Yourself Joint Pain Relief Homepage
Another S.I. Joint Pain Relief Hero:
"Hi Gary, I found your web site last Thursday after searching in desparation for relief for what my osteo and physio called sacroiliac joint dysfunction. I was supposed to be going to pain management today but after using the tennis ball and various other balls i have been able to cancel all appointments. I have my life back thanks to you..." - Marion, United Kingdom
This Free Pain Relief Website
By Clicking On Your Favorite Icon Below:
Add Gary Crowley to your Google Plus Circles -
Google+ (click here)
Copyright © 2011 - 2022 DiyJointPainRelief.com


