Hip Pain Relief

Just follow along with the videos below.
Go directly to any Hip Pain Relief video on this page by clicking these links:
Intro,
Video 1,
Video 2,
Video 3 .
Pain Relief Success Story, From Lea:
"Last night I woke with hip pain after sleeping on it. Normally I would stagger to the bathroom for a painkiller. But staying in bed and covered, I did your stretch with the ankle over the opposite knee, and held this until the pain slowly and surely ebbed away. I slept soundly after this. Miraculous. I am continually thankful to you for your inspirational website, and the power this gives me over my aches and pains. Thank you so much for your generosity and your calling... I tell everyone about your website." Lea, Australia
You can do it too!
Click directly to any pain relief video on this page:
Intro,
Video 1,
Video 2,
Video 3 .
*Please Watch This Short Video First. Thanks.
Please visit the techniques page now, if you haven't already.
On the homepage I describe…in detail…the 3 Simple Steps and the 4 Basic Facts about your body that make it possible for you to provide your own joint pain relief.
Detailed Instructions For
Hip Pain Relief
Click directly to any pain relief video on this page:
Intro,
Video 1,
Video 2,
Video 3 .
The muscles in your hip area attach to your hip bone (ilium), your tailbone (sacrum), and your upper leg bone (femur). The general term "hip pain" means any of these attachments could be the cause of your pain, so we're going to free any inappropriately tight muscles in the area.
Here's what we're going to do:
A. Tennis Ball Release of Hips -
The tennis-ball-press technique is a very powerful tool to release your hips. I love a good hip stretch, but nothing gets at and releases those specific areas of tension like this tennis-ball-press technique.
It's pretty simple really. You just sit on a tennis ball or other ball you have handy, and notice where there is tissue that is painful and/or tender when the pressure from the ball pushes into it. All along the edge of your sacrum, up to top edge or your hip bones, out to the edge of your femur, all the way down to the tops of your hamstrings are where you'll be looking for tight tissue to release.
Once you are comfortably relaxing into a tender spot, use press-hold-move technique to help the tissue release. Moving your leg......even a little bit......or tilting your pelvis back and forth are good ways to get that tissue under the tennis ball to move a bit and help it to release.
Generally, you to apply as much pressure as you can relax into, and then move your leg enough so that you feel the tissue being pressed on by the ball move a bit. Keep moving your leg to make the movement happen and usually within 10 to 30 seconds you'll feel the tissue become less painful. That's how you know you've gotten a release.
You'll want to make sure and do BOTH sides of your body and not only the side with the painful hip.
How much hip pain relief this one technique provide?
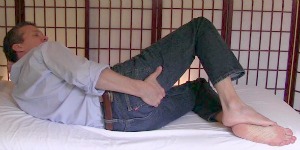
B. Reclined Hip Stretch -
-lie on your back
-knees bent, feet flat on the floor
-cross one leg over the other, so your ankle is resting on your opposite knee
-in one motion, shoot your arm over your shin (right shin use right arm, left shin use left arm
-reach through the space in your legs and grap your forearm with free hand
-pull leg toward you and feel the stretch in your buttocks
-pull and release, pull and release for 20 to 60 seconds
-switch sides
-do 3 reps per side
How much hip pain relief this one technique provide?
C. Seated Hip Stretch -
-sit on the floor with one leg in front of you and one leg behind you
-bend both front and back knee at about a 90 degree angle
-lean forward over your shin, primarily toward your ankle if you can
-if you feel this stretch in your knee then move your foot closer or further away from you until you no longer feel it in your knee.
-do 3 reps of 10 to 30 seconds on each side of the body
-make sure and do both sides of the body
How much hip pain relief this one technique provide?
D. Optional Technique - Obturator Internus Release
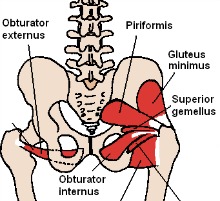
This technique targets pain that is specifically on the outer most side of your hip on the top of your leg bone at the outer most edge (femoral head, the greater trochanter).
It definitely helps to see me work on it in the video and guide you, since the muscle is rather to tricky to get at.
Please watch the last minute of the Step 1 video to see this technique.
How much hip pain relief this one technique provide?.
Click directly to any pain relief video on this page:
Intro,
Video 1,
Video 2,
Video 3 .
Many of the nerves that pass through your hip originate in the vertebrae of your lower back, so we want to make sure there aren't any nerves being yanked on in your low back that are causing your hip pain. This one stretch can often provide the hip pain relief you've been seeking.
Here's what we're going to do:
A. Passive Low Back Stretch -
-stack up some towels, couch cushions, or other stable flat surface you can make about 6 inches high that will be stable for you to lie on
-with a pillow to support your head, lie on the surface you've created with your lower back hanging off the edge, and your buttocks just barely touching the floor
-move forward or back on your platform to create a GENTLE traction on your lower back
-now put the soles of your feet together, so your knees are hanging out to the sides
-take some pillows and place them under your thighs to give you some gentle support (this helps your lower back release even more)
-stay in this position for 5 minutes the first time you do it, but once you're used to the position you can do 10 or 15 minutes
-when you are done, to get out of the position, bring your knees together and roll to one side SLOWLY. Take your time getting up
How much hip pain relief did this one stretch provide?
Click directly to any pain relief video on this page:
Intro,
Video 1,
Video 2,
Video 3 .
Hip pain relief can also come from releasing the muscles of your upper legs.
Here's what we're going to do:
A. Outer Thigh Muscle Release -
We'll be using the press-pull-release technique along with the hand-on-hand technique to get this important muscle to release.
-in a seated position press into the tissue on the outer third of your thigh and notice any areas that are painful/tender when you press on them
-pick one of the painful spots and press your fingertips into the tissue and then press on your fingertips with your other hand to create more pressure
-now do the press-hold-move technique by working with the tissue like you're sculpting clay. Press, pull about a half on the tight spot, release. Then repeat, repeat, repeat.
-when the tissue becomes less painful or not painful at all then move to another spot
-if a spot is really stubborn, move on to another area and come back later to the stubborn area. You may find it more cooperative when you return
-make sure and do BOTH legs
How much hip pain relief this technique create?
B. Side of Leg Release -
We'll be releasing the tissue on the very side of your thigh and hip. The very long tendon called the iliotibial band and the muscle called the tensor fascia latae will be our targets.
Just like in Step A in this video, we'll be using the press-pull-release technique and the press-hold-move technique to release these areas. At the very top of your hip in the muscle located between the top of your femur and the top of the side of your hip bone, you may also want to use the tennis-ball-press technique if the tissue is particularly stubborn.
- just like Step A, find tender spots with your fingertips
-use the hand-on-hand-technique to get good pressure on the spot
-do the press-pull-release on any tight spots
-lastly, do the tennis-ball-press on the tensor fascia latae if you need a bit more pressure than you can create with your fingertips.
Assess how much this release helped reduce your hip pain.
C. Hamstring Stretch -
Best Hamstring Stretches is an entire video just on hamstring stretches, if you're interested.
Here's a simple an effective hamstring stretch:
-keep your legs straight (not bent!) for this entire stretch
-stand with feet approximately shoulder width apart, with your weight in the balls of your feet
-gently fall forward and let your hands hang toward the floor
-while keeping your legs straight, flex your thighs, and push your hand toward the floor
-you should feel this all the way up the backs of your legs and into your buttocks
-do this for 5 to 15 seconds if you can
-do three sets of 3 reps per set
-your hamstrings can get very loose very quickly if you do this stretch regularly throughout the day for a couple of weeks
How much hip pain relief this hamstring stretch provide.
Self-Assessment Of
Hip Pain Relief
Was there one specific hip pain treatment that instantly relieved your hip pain?
Remember what worked best for you, so you can do that first next time you need it.
Are you still experiencing some hip pain?
Investigate a bit and you'll eventually find which techniques work best for you to provide the best hip pain relief. Then you'll be able to fix yourself whenever you desire because you'll have your own personalized hip pain relief treatment……literally at your fingertips!
If you're interested in more hip pain relief, you may benefit from any of the following techniques. Your hip joint pain relief may come anyone one of these. Once you find your way in, it's yours forever.
To visit the Best Groin Stretches page (click here)
The "tennis ball tune-up" (click here) to check out a great hip pain relief maintenance protocol.
This lower back pain remedy with a massage tool is worth checking out if you like using massage tools.
Lower Back and Buttock Pain Relief
Return from this Hip Pain Relief page to the
Do-It-Yourself-Joint-Pain-Relief Homepage
This Free Pain Relief Website
By Clicking On Your Favorite Icon Below:
Add Gary Crowley to your Google Plus Circles -
Google+ (click here)
Copyright © 2011 - 2022 DiyJointPainRelief.com


