Foot Pain Relief
I will show you simple and effective techniques to free the inappropriately tight tissue that is most likely causing your symptoms.
Just follow along with the videos below.
are below on this page.
Go directly to any Foot Pain Relief video on this page with these links:
Intro,
Video 1,
Video 2,
Video 3 .
Pain Relief Success Story, From Leena:
"...I would like to thank you from depth of my heart for these miraculous excercices. Last night I was watching you tube and accidentally came across your techniques. I am in bad worst pain conditions since birth of my son four years ago. GP here says its due to vit d deficiency which is now normal. I tried foot pain relief exercises and they worked wonders. I was really shocked... I am really impressed...thank you loads... We helpless people really need angels like you who are working generously for people like us. Thanks once again..." Leena, United Kingdom
You can do it too!
Click directly to any pain relief video on this page:
Intro, Video 1, Video 2, Video 3 .
*Please Watch This Short Video First. Thanks.
Please visit the techniques page now, if you haven't already.
On the homepage I describe…in detail…the 3 Simple Steps and the 4 Basic Facts about your body that make it possible for you to provide your own joint pain relief.
Detailed Instructions For
Foot Pain Relief
Click directly to any pain relief video on this page:
Intro, Video 1, Video 2, Video 3 .
Here's what we're going to do:
A. Top Of Foot Muscle Release -
Siting on a bench or in a chair, or lying on the floot.

Now, position the ankle so it hangs out past the leg it is resting on……again just like one would often do in regular life.
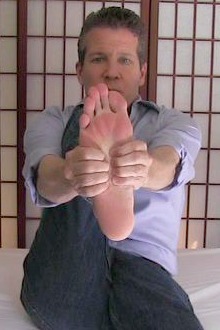
Reach over the top of your foot with the hand from the same side as your foot pain and press your fingertips into the top upper half of your foot. Flex your toes up and down and let your fingers feel the muscles that perform that function moving under them. These are the muscles you want to make sure are free.
Now take your other hand and reach under your foot so that your fingertips land on the top half of your foot in the same general area as the fingertips from your other hand.
Now perform the press-hold-move technique. It's easiest if you try and flex all your toes at once, up and down, up and down, etc.
Take a break if you need to.
Notice how much foot pain relief this one technique provides.
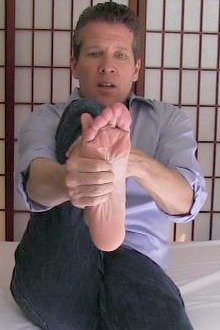
B. Bottom of Foot Release -
Take the foot experiencing pain and rest it on your opposite thigh or knee just like your were crossing your leg in normal life.
Rest the side of your foot and ankle on your thigh so the bottom of your foot is accessible for you to grab with your thumbs.
Press your thumbs into the muscle tissue on the bottom of your foot……from the front of your heel bone to the ball of your foot……and notice any spots where the tissue is tender. Remember, tender tissue is inappropriately tight tissue that needs to be released.
Now, do the press-pull-release technique on each tender spot. This is described in detail on the the techniques page. Work on each one 30 seconds, then move to another one.
Take a break whenever your thumbs get tired. There is not rush, take your time with this.
You can also do the press-hold-move technique on this same area while you flex your toes and hold on one spot.
Do at least 2 more rounds on the bottom of your foot before moving on to Step 2.
Notice how much foot pain relief this specific technique provides for future reference.
Click directly to any pain relief video on this page:
Intro,
Video 1,
Video 2,
Video 3 .
*Do not underestimate the power of these stretches. Quite often, they will provide instant foot pain relief for those who do them.
Here's what we're going to do:
A. Reclined Hip Stretch -
This stretch may seem like I'm trying to get you to twist yourself into a pretzel, but once you get the hang of it, it can be one of the best tools in your pain relief toolbox.
Watch, pause, replay the video if you need to, and then do this stretch at the level you can.
Notice how much foot pain relief this one technique provides for future reference.
B. Seated Hip Stretch -
Once again, you make feel like I'm trying to get you into body positions that are a bit tricky for you to perform.
This seated hip stretch along with the reclined hip stretch are two of my "go to" stretches after sitting too long at the computer.
Again, the videos are there so you don't have to rush or try and keep up in any way. Go through them at whatever pace allows you to do them properly. You'll be glad you did.
Notice how much foot pain relief this one technique provides for future reference.
C. Hamstring Stretch -
First, my Best Hamstring Stretches page is absolutely great if you have any further questions about stretching your hamstrings.
If you are good to go, then just remember to flex those quadriceps and keep your legs straight. If you do that, then you'll do great!
Click directly to any pain relief video on this page:
Intro,
Video 1,
Video 2,
Video 3 .
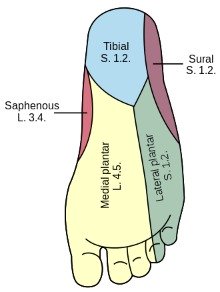
All the muscles that attach to your foot from above, below, in front and back, and on both sides need to be properly balanced with each other in order for your foot to work properly.
Here's what we're going to do:
A. Outer Lower Leg Release -
The muscles on the very outer edge of your lower leg attach to the bottom of your foot, so they may need to be released as well. So we're going to use the same body position as Step 1 to get the job done.
Sit in a chair or lie on your back to what follows.
Take the foot experiencing foot pain and rest it on your opposite thigh or knee just like your were crossing your leg in normal life.
Position the ankle so it hangs out past the leg it is resting on……again just like one would often do in regular life.
Now use the hand-on-hand techniqueand press your finger tips from one hand onto the muscle tissue on the very outer edge of your lower leg……from the bottom outer edge of your knee down the side of your all the way down to your ankle. These are your peroneal muscles.
Move your ankle from side to side while you press on any tender tissue using the press-hold-move technique. You'll know you're moving your ankle the right way when you can feel the muscle tissue moving under your fingertips as you press.
Find as many tender spots as you can and press into them while moving your ankle.
You can also use your thumbs on the very lower section of your outer lower leg between your achilles tendon and your lower out leg bone (fibula). Do the press-hold-move technique on any tender tissue as you flex your foot up and down.
Take a break. Do at least 2 more sets on these muscles before moving on.
How much foot pain relief does this provide?
B. Inner Lower Leg Release -
Many of the muscles on the inner side of your lower leg attach to the bottom of your foot, so they may need to be released as well. So we're going to use the same body position as Step 1 to get the job done.
Sit in a chair or lie on your back to what follows.
Take the foot experiencing foot pain and rest it on your opposite thigh or knee just like your were crossing your leg in normal life.
Position the ankle so it hangs out past the leg it is resting on……again just like one would often do in regular life.
Now use both of your thumbs and press them into the tissue of your lower leg……from the bottom inner edge of your knee down to the inner side of your ankle.
Move your ankle from side to side, make some circles with your foot, flex your foot up and down, all while you press on any tender tissue using the press-hold-move technique. You'll know you're moving your ankle the right way when you can feel the muscle tissue moving under your thumbs as you press.
Find as many tender spots as you can and press into them while moving your ankle.
Take a break. Do at least 2 more sets on these muscles before moving on.
How much foot pain relief does this provide?
C. Calf Stretch (do this stretch slowly) -
Stand on the edge of a stair with the weight in the ball of your foot.
Slowly , gently let your heel drop below the level of the ball of your foot until you feel a stretch in your calf muscle. Slowly ad more of your bodyweight to the stretch until your heel is as far down as you are comfortable going. Do NOT bounce, go slowly.
Now raise your ankle slowly back up to level with the ball of your foot, and then slowly lower it again. Do this and notice how each time your calf lets go a bit more. Important - This is NOT a calf raise, DO NOT raise your heel any higher than the level of the ball of your foot.
Repeat this stretch slowly and gently until you notice a substantial improvement in your calf tension. Feel free to do alternate sets with your other calf as it's probably tight as well, and will give your first calf a bit of a break.
How much foot pain relief does this provide?
Self-Assessment Of
Foot Pain Relief
Which techniques gave you the most foot pain relief?
Did Step 1, Step 2, or Step 3 work best?
Was there one specific foot pain treatment that instantly relieved your foot pain? Remember what worked best for you, so you can do that at the first sign of foot pain.
Are you still experiencing some foot pain?
Which muscles are still tender (that means they are too tight!) and could use some more work?
Go back and repeat those techniques that seem to need a few more rounds. You may be pleasantly surprised at the results you get now that you've released other muscles that may prevented them letting go on the first attempt.
Investigate a bit and you'll eventually find which techniques work best for you to provide the best foot pain relief. Then you'll be able to fix yourself whenever you desire because you'll have your own personalized foot pain treatment……literally at your fingertips!
Plantar Fasciitis Treatment - put an end to plantar fasciitis symptoms in three simple steps.
Do the bottoms of your feet feel like they are burning?
If yes, visit the Burning Feet Sensation Relief page now.
Shin Splints Treatment - relief from your shin splint symptoms in three simple steps.
Return from this Foot Pain Relief page to the
Do-It-Yourself Joint Pain Relief Homepage
More DIY Foot Pain Relief Testimonials:
"After years of pain medications, steriod shots and taking steriods by ingestion....surgery,....the list goes on and on.....for four years I suffered with ankle/foot pain....I found your site...I had given up on doctors....I studied your techniques and started doing them to my ankle/foot. I had a lot of immediate relief so I kept doing and improving on learning finding the right places/the right muscles and kept doing your techniques at least once a day. After less then a month I am pain FREE! If I feel an inkling of pain starting I know how to find and release the muscles in my ankle/foot and prevent pain from starting. Thank you so much!" - Joyce, United States
"Gary, thank you - big time. Please keep doing what you're doing. I wanted to leave this message on your youtube, but for some reason it wouldn't take. I had foot pain, burning (Yikes) and a strong, dull pain in the foot. I thought I might have to give up walking through a market, and get one of those motorized carts insteadh. Your first Youtube on it cured me in 5 mintutes (after months). No kidding. It was in the back, #5, I think you said. And now it's super. I will stop, except to say how important this was to me, and again, thank you." Peter, United States
This Free Pain Relief Website
By Clicking On Your Favorite Icon Below:
Add Gary Crowley to your Google Plus Circles -
Google+ (click here)
Copyright © 2011 - 2022 DiyJointPainRelief.com


