Ankle Joint Pain Relief
Just follow along with the videos below, and it won't be long before you have gotten positive results.
Go directly to any Ankle Joint Pain Relief video on this page with these links:
Intro,
Video 1,
Video 2,
Video 3 .
Pain Relief Success Story, From Marie:
"Just came across your site recently and wanted to thank you for the informative material both in video and written format. I'm a fellow therapist but the methods you use have helped me get some relief on a personal level from an ankle injury and also to release tight shoulder muscles, I will definitely be recommending your site to others including clients for self help techniques." Marie, United Kingdom
You can do it too!
Click directly to any pain relief video on this page:
Intro,
Video 1,
Video 2,
Video 3 .
*Please Watch This Short Video First. Thanks.
Please visit the techniques page now, if you haven't already.
On the homepage I describe…in detail…the 3 Simple Steps and the 4 Basic Facts about your body that make it possible for you to provide your own joint pain relief.
Detailed Instructions For
Ankle Joint Pain Relief
Click directly to any pain relief video on this page:
Intro,
Video 1,
Video 2,
Video 3 .
Here's what we're going to do:
A. Shin Muscle Release -
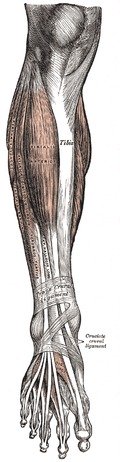
The good news is that our standard techniques we use for every other muscle in the body will work just fine on this muscle too. I generally start out using the press-hold-move technique with the hand-on-hand technique to release any tight tissue I find.
Dig those fingertips into the tissue as you can, then press on those fingertips with your other hand, and then flex your foot up and down while you're pressing. Do this on every tight spot you find along this muscle.
Was your ankle joint pain reduced from doing this technique?
B. Top Of Foot Muscle Release -
Cross the foot you want to work on over your other leg.
Grab your foot with both hand so the fingertips from both hands end up resting on the top of your foot.
Now do the press-hold-move technique.Flex your toes up and down while you press with the fingertips from both hands into any tender muscle tissue on the top of your foot. When it releases move to another tender spot.
If it doesn't release right away, take a break. Do at least two more rounds before moving on to Step 2.
You can also do the press-pull-release technique on this tissue. It can only help.
Notice how much ankle joint pain relief this one technique provides.
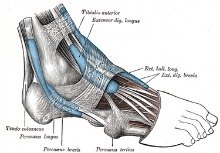
C. Ankle Wrap Release -
Sometimes this technique is all you will need to do!
There is some tendons material that wraps your ankle like an ace bandage just below the surface of your skin……it's called the retinaculum. It helps hold the tendons and bones in place, but if it gets to tight it can cause ankle joint pain.
Just like the Technique A & B above….
Do the press-hold-move technique on any tender spots you find on your retinaculum. While gently flexing your foot up and down, and rotating your foot…… gently press on any tender tissue you find. You'll want to gently press on the bones as well……which we don't often do……but if there is a spot that is extra tender you'll need to rub on it to release the retinaculum that may to stuck on the bone. Using your thumbs is okay too.
You can also do the press-pull-release technique on this tissue. It can only help.
Notice how much ankle joint pain relief this one technique provides.
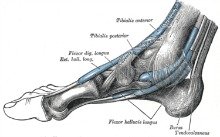
D. Tibialis Posterior Release
While sitting or lying on your back, cross your ankle over your opposite knee. Press your thumbs into the space between where your achilles and your lower shin bone (tibialis bone).
Do the press-hold-move technique and the press-pull-release technique on any tender spots. Flex your foot up and down and press on any tender tissue you find. Work the area from the top of your heel bone about 2/3's up your shin.
How much ankle joint pain relief did this one technique provide?
Click directly to any pain relief video on this page:
Intro,
Video 1,
Video 2,
Video 3 .
Here's what we're going to do:
A. Reclined Hip Stretch -
This stretch is best learned via the video above, but keep in mind……
First, you are trying to free any tight tissue that may be aggravating the nerves that begin up in your lower back and hips, but eventually end up innervating your lower leg, ankle and foot. Tight tissue in your buttocks can be the cause of your ankle pain, so don't skimp on these stretches.
The reclined hip stretch is great because you get some real leverage on those big muscle groups that sometimes need a fair amount of force to access and release the tension.
Once you learn it, you can do it anytime you'd like. It's a stretch that actually feels pretty good to do, so if this is an issue for you, then just drop into this stretch several times throughout the day or in the middle of a workout if you feel it will help you.
Always do both sides. Always do both sides.
Notice how much ankle joint pain relief this one technique provides. It's a good one!
B. Seated Hip Stretch -
Just like with the reclined hip stretch this seated hip stretch gets deep into those hips and releases tension that may be hard for you to get at in other ways.
Go easy, but once you are comfortable, really lean into these stretches. Test different angles. And as I always say, if you feel this stretch in your knee then you need to reposition your foot to take the torque of your knee and into the muscles you are stretching .
Notice how much ankle joint pain relief this one technique provides.
C. Hamstring Stretch -
The keys to this hamstring stretch are:
1. always, always, always keep your legs straight (do not bend your knees, even if you want to cheat, do not bend your knees)
2. always, always, always flex your quads when you bend forward to protect your lower back.
3. when you are doing this stretch properly you will feel the stretch all the way up the backs of your legs.
This is a stretch you can do throughout the day whenever you have a free minute. Do that and you'll be amazed at how quickly your hamstrings change for the better.
Lastly, the Best Hamstring Stretches (click here) has even more if you're interested.
Click directly to any pain relief video on this page:
Intro,
Video 1,
Video 2,
Video 3 .
Here's what we're going to do:
A. Calf Stretch (do this stretch slowly) -
First, I'd like to recommend my new Best Calf Stretches (click here) page for a full explanation of the varies ways to stretch your calves.
That said, the key thing to remember is to go very slowly when doing these stretches so that you don't strain your achilles. Especially for those people 35 years of age and older.
Also, the master key to this stretch is truly to keep your calf muscle engaged (slightly flexed) throughout the entire range of the stretch. Even when you are in the stretch phase of the stretch, you'll want a little resistance flexing against the stretch. This will enhance the effects of the stretch, but is will also protect your calf and achilles during the stretch.
This one stretch may provide a great deal of ankle joint pain relief, so take notice if it does.
B. Outer Lower Leg Release -
We're going to use our standard tools to release the muscles on the outer edge of your lower leg.
Personally, I usually start with my fingertips and do the press-hold-move technique with the much needed assistance of hand-on-hand technique
Just press into any tight tissue your find and flex your foot to the side and up and down as you press on the tight tissue.
If my hands need a brake from that specific technique I'll usually do some specific press-pull-release technique but always with the aid of thehand-on-hand technique. These muscles can take, and often require the extra pressure given with the extra hand involved.
Especially if your pain was on the outside edge of your ankle, notice the amount of ankle joint pain relief this one technique provides.
Self-Assessment Of
Ankle Joint Pain Relief
Which techniques gave you the most ankle joint pain relief?
Was there one specific ankle joint pain treatment that instantly relieved your ankle pain?
Which muscles are still tender (that means they are too tight!) and could use some more work?
Investigate a bit and you'll eventually find which techniques work best for you to provide the best ankle joint pain relief. Then you'll be able to fix yourself whenever you desire because you'll have your own personalized ankle pain treatment……literally at your fingertips!
Return from this Ankle Joint Pain Relief page to the
Do-It-Yourself Joint Pain Relief Homepage
This Free Pain Relief Website
By Clicking On Your Favorite Icon Below:
Add Gary Crowley to your Google Plus Circles -
Google+ (click here)
Copyright © 2011 - 2022 DiyJointPainRelief.com


