Upper Back Pain Relief
The follow-along videos below will give you what you need to set yourself free.
Go directly to any Upper Back Pain Relief video on this page with these links:
Intro,
Video 1,
Video 2,
Video 3 .
Pain Relief Success Story, From Leah:
"THANK YOU so much for these videos! I got instant relief from upper back pain that I have suffered from on and off for about 10 years. I've seen chiropractors and physical therapists, but your tecniques worked much faster and helped relieve my pain almost instantly. This last flare up I've been dealing with was almost to the point where I was deserpate enough to use toxic muscle relaxors. I've been stretching and icing my back for several weeks now, but after following your 3 steps on uppper back pain, I was able to sleep without having pain. Thank you for taking the time to make these videos and offer them for free! You are a lifesaver!" Leah, United States
You can do it too!
Click directly to any pain relief video on this page:
Intro,
Video 1,
Video 2,
Video 3 .
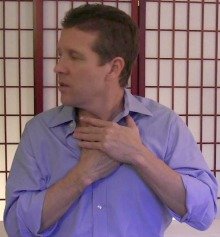
*Please Watch This Short Video First. Thanks.
Please visit the techniques page now, if you haven't already.
On the homepage I describe…in detail…the 3 Simple Steps and the 4 Basic Facts about your body that make it possible for you to provide your own joint pain relief.
Detailed Instructions For
Upper Back Pain Relief
Click directly to any pain relief video on this page:
Intro,
Video 1,
Video 2,
Video 3 .
Here's what you're going to do:
A. Upper Inner Back -
You can get a lot of relief, often instant relief, by releasing the muscles that lie between your spine and the inner edge of your shoulder blade.
We'll mostly want to release them with the press-hold-move technique with the assistance of the tennis-ball-press technique.
You'll absolutely want to do this in this area on both the left and right sides of your spine. You can lean against the wall with the tennis ball or lie on the floor with the tennis ball. Do whatever works best for you.
Just find tight/painful tissue using the tennis-ball-press, and then move your arm and spine to get that tissue to release while you press on it.
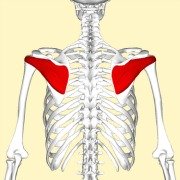
B. Upper Outer Back -
Your infraspinatus muscle) covers the outer surface on your shoulderblade.
So now, just like in the previous Step1A, using wall or the floor, do the tennis-ball-press technique along with the press-hold-move technique to release any tight tissue you may find in this area.
Spend as much time doing these Step 1 techniques as you'd like. This area is often a "hurts so good" kind of work, so if you've got a lot of tight tissue here then there is no time limit.
How much upper back pain relief did Step 1 provide?
Click directly to any pain relief video on this page:
Intro,
Video 1,
Video 2,
Video 3 .
Now that the larger muscles in this area are released, we're going to focus on a smaller group of muscles that lies underneath the muscle groups we've already been working on.
Here's what you're going to do:
A. Upper & Middle Spine -
Doing the same as we did in the last video, use the tennis-ball-press technique. We'll be going after your erector spinae muscles that are very much like a rope that runs up both sides of your vertebrae.
You want the tennis ball pressing as close to your vertebrae as possible, but not pressing on the vertebrae themselves. Once you find some tender/painful tissue do the press-hold-move technique to get the tissue to let go.
There may be some stubborn spots, so feel free to work on them for a while, but then go work elsewhere for a period of time. When you revisit the area you may find it's much more cooperative!
Click directly to any pain relief video on this page:
Intro,
Video 1,
Video 2,
Video 3 .
Here's what you're going to do:
A.Underside of Collarbone -
There are three very important muscles that you'll need to release on the underside of your collarbone: subclavius, pectoralis major and minor muscles. If any one of these is yanking on your upper ribs on the front of your chest it can negatively affect your upper back.
The underside of your collarbone is a fantastic place to incorporate the hand-on-hand technique. while doing the press-pull-release technique on any tight tissue you find in this area.
Do a good job here and it will make everything in your shoulder girdle function better.
Did a large degree of upper back pain relief occur from this technique.
The press-hold-move technique is also a viable technique in this area if you'd like to give it a try.
Self-Assessment Of
Upper Back Pain Relief
Was there one specific upper back pain treatment that instantly relieved your pain? Remember what worked best for you, so you can do that first next time you need it.
Are you still experiencing some upper back pain?
Go back and repeat those techniques that seem to need a few more rounds. You may be pleasantly surprised at the results you get now that you've released other muscles that may prevented them letting go.
Investigate a bit and you'll eventually find which techniques work best for you to provide the best upper back pain relief. Then you'll be able to fix yourself whenever you desire!
If you still need a bit more release from upper back muscles consider adding this massage tool release (click here). It's a great technique to add to your upper back pain relief program.
Pain In Upper Right Back Treatment
Pain In Upper Left Back Treatment
Return from this Upper Back Pain Relief page to the
Do-It-Yourself Joint Pain Relief Homepage
This Free Pain Relief Website
By Clicking On Your Favorite Icon Below:
Add Gary Crowley to your Google Plus Circles -
Google+ (click here)
Copyright © 2011 - 2022 DiyJointPainRelief.com


