Neck and Shoulder Pain Relief

You can fix it pretty rapidly, in most cases, once you know what to do. And in the videos on this page, I will show you precisely what to do.
Go directly to any Neck and Shoulder Pain Relief video on this page with these links:
Intro,
Video 1,
Video 2,
Video 3 .
Pain Relief Success Stories:
"I just went through steps 1,2 and 3 of your videos and...my shoulder feels 10 times better...So thank you, I'll be saving your site on my favorites as I'm a professional snowboarder and I could get a lot of help here!" Tyler, Switzerland
"As simple as the techniques shown on your website, they instantly relieved the tightness in my neck and shoulder. Thank you so much for this website. I've tried everything and this is the first time something actually worked so quickly. I have donated to you because your legit. Thanks again!" Patrick, United States
You can do it!
This short introductory video is a great place to start.
Click directly to any pain relief video on this page:
Please visit the techniques page now, if you haven't already.
On the homepage I describe…in detail…the 3 Simple Steps and the 4 Basic Facts about your body that make it possible for you to provide your own joint pain relief.
Lastly, if you believe your pain is due solely to stress, you can try the neck and shoulder pain quick fix first. Just promise to come back here if it doesn't "quick fix" it.
Step 3A releases the muscles that negatively affect your levator scapulae. It usually restricts the turning of your head in the "no" motion when it is compromised.
Intro,
Video 1,
Video 2,
Video 3 .
Feeling Lucky!? You might want to scroll down and do Step 3A first, and then do everything else. If I could only give you one technique to do for your neck and shoulder pain, it would be Step 3A.
Detailed Instructions For
Neck and Shoulder Pain Relief
Click directly to any pain relief video on this page:
Intro,
Video 1,
Video 2,
Video 3 .
Most people can relieve their own neck and shoulder pain fairly rapidly. You simply need someone to show you how to do the right things to set your body free. We'll be using hand-on-hand technique and press-hold-move technique.
Here's what you're going to do:
A. Upper Neck Release -
With the tips of your fingers, feel the area where your neck and the base of your skull intersect. Feel both the area that is your "upper neck" with the muscle tissue you can press into, and the base of your skull (the occiput) that is bone with muscles and soft-tissue covering it.
Press with your fingertips into the tissue at the base of your skull and upper neck and notice any areas that are painful when you press on them. Painful tissue is tight tissue and if your release that tight tissue it will help you relieve your pain, not just in the that specific area, but in other areas as well. You can stand, lie on the floor, or sit in a chair while you investigate this area for painful/tender/tight tissue.
Now we'll incorporate the hand-on-hand technique, which will allow you to apply firm gentle pressure to the tight tissue you will be working on. This technique is actually pretty simple: you just press on the tight tissue with your fingertips, while pressing on your fingertips with your other hand. It does make the work much easier!
Next we'll be applying the press-hold-move technique to help release any tight tissue you've found. Quite simply, press on any tight tissue you've found using the hand-on-hand technique, and while maintaining pressure on the tight tissue with your fingertips, move your head and neck in a way that makes that tight tissue move under your fingertips. You can nod, turn, tilt your head in anyway that makes that tissue move. Notice when the tissue becomes less painful because that means it has released.
You can do these techniques for as long as you like, but if your hands need a break or the tissue is really stubborn, then take a break. Go work on some other tight spots for a while and it will help the stubborn spots let go. If you want to incorporate the press-pull-release technique as well to any tight tissue that's great too. Whatever works is great!
B. Lower Neck Release -
Now that you're getting the hang of it, we'll continue to use the hand-on-hand technique and the press-hold-move technique to go all the way down the rest of your neck on both sides, releasing any tight/painful/tender tissue you find.
Do just what you did in Step A and make the tissue move under the pressure of your fingertips by nodding, tilting, and turning your head in any direction require to make that happen.
Be thorough, but also take your time. You can do the tissue along the spine, then move out an inch and get the neck muscles a bit further away from the spine. When you and/or your fingertips need a break then definitely take one.
Notice how much neck and shoulder pain relief occurred from working on this area of your neck.
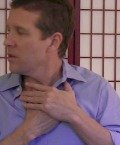
C. Neck/Shoulder/Back Intersection Release
Now we'll use your fingertips of one hand to work on the opposite shoulder/neck/upper back intersection.
Take one of your hands and hang it over your opposite shoulders with your fingertips about where your neck and shoulder come together. We'll be working on the tissue you can comfortably reach from this position, which means you can work along the top your shoulder, down your back a bit, and a bit on your lower neck.
Poke around with your fingertips and locate any painful/tender/tight tissue, and then apply the press-hold-move technique. From this position you'll have to do much more moving of your arm and shoulder in order to get the tissue under your fingertips to move, but you can also turn and tilt your head if it gets the job done.
You will want to do this technique on both sides of your body, even if your pain is only on one side.
Feel free to go through steps A, B, and C of this video again before moving on the the Step 2 video. Do this especially if there is a lot of tight tissue that didn't release the first time around. By the time you've gotten here, you're already much better at freeing your tight tissue than when your first started.
And, "how much neck and shoulder pain relief" did Step 1 give you? Make a mental note.
Lastly, in the interest of doing whatever works for you, mix in some press-pull-release technique on any tight tissue you desire. It can only help.
Click directly to any pain relief video on this page:
Intro,
Video 1,
Video 2,
Video 3 .
There are times when releasing one tight muscle that is restricting one nerve can immediately relieve your neck and shoulder pain. In this video you'll be applying the tennis-ball-press technique and the press-hold-move technique to help release your upper back.
Here's what you're going to do:
A. Upper Spine -
To do the tennis-ball-press technique you can use any ball you like. Tennis balls seems to work pretty well, but if a baseball, lacrosse ball, etc. is all you have handy, or whatever seems to work best for you, then thats fine. You can also stand and lean against the wall to do these techniques or lie on the floor. I prefer the floor, but everyone is free to do what works best for them.
To begin, place the ball you are using in the soft-tissue between your shoulder blade and your spine. Investigate a bit and notice some of the tender spots in this area.
And now, using the ball to apply pressure to the tight tissue, do a press-hold-move technique. In this area, sliding your arm up and down the wall or along the floor is an effective way to get the tissue you are pressing on to move under the pressure of the ball. You can do this for 10, 20, 30 seconds on any tight spot. Feel free to move to other spots and then come back.
This is definitely an area where the pressure can "hurt so good," as you attempt to release it.
This should be done to BOTH sides of your spine.
Again, a lot of folks enjoy working on this area of their upper back, so work on this area as long you'd like. It will only help everything else to let go if this area is as free of inappropriate tension as you can make it.
Notice how much neck and shoulder joint pain relief you get from working on this particular area.
Click directly to any pain relief video on this page:
Intro,
Video 1,
Video 2,
Video 3 .
It's important to go through all the techniques below so you can discover where you are inappropriately tight. Any one of these muscles being released may cause your neck and shoulder pain to be instantly relieved, and that's great, but do yourself a favor if that happens and check out all the areas I'm showing you.
Releasing tight tissue in other areas I point out, even after you pain is gone, will only help to make the pain relief to be more stable and longer lasting.
Here's what you're going to do:
A. Side of Shoulder Blade -
Releasing the side of your shoulder blade and the inside edge of your shoulder blade can often give instant relief from neck and shoulder pain. It's probably the area I go to first when I have this issue.
Take your fingertips and reach around to locate the outer edge of your shoulder blade. There are two muscles that run along the outer edge: teres major and teres minor.
And then take your fingertips and come in toward your ribcage with your fingertips and press into the space between your ribcage and your shoulder blade. The muscle you feel is called your subscapularis muscle.
Start by doing the press-hold-move technique on any painful/tender areas you find in any of these three muscles. Again, the key is to raise and lower your arm (I usually have my arm bent) so that the tissue you are pressing on is forced to move under the pressure. It moves from the motion you are making with your arm.
You can play around with the best way for you to access these muscles. Some find bending forward a bit helps, other prefer to lie on their side on their bed or floor. Find what works for you and get to work. You can do it! It's worth the time and effort.
Pay attention to how much neck and shoulder pain relief this technique provides. Make a mental note of how much relief you achieved from this one area.
B. Side of Rib Cage -
Next in line is a muscle that attaches to the side of your ribcage and your shoulder blade, your serratus anterior. When it gets tight it will pull on your shoulder blade and negatively affect your neck, shoulders, and everything in between.
I prefer to have the shoulder as relaxed as possible on the side I will be working on. The best way I've discovered to do this is to take the hand from the side I'll be working on and hang it over my opposite shoulder. This will provide easier access to the areas we'll be working on.
Take your free hand and reach around to the side of your ribcage just below your shoulder blade on the opposite side of your body. You'll need to use your fingertips to to do the press-pull-release technique on any tight tissue you find. Work with the tight tissue like it's clay. It will respond by letting go!
Lying on your bed or on the floor is also a preferred position for some folks, so feel free to give it a try.
It can be a bit tiring for some people doing this technique because you're a bit twisted and it takes more effort than some of the techniques we've done already. So remember, there is no rush. Just do what can, at the pace you can, and you'll do great. Slow and steady wins the race!
Pay attention to how much shoulder and neck pain relief you get from releasing your serratus anterior.
Your serratus anterior also responds well to the press-hold-move technique by pressing on the tissue and raising and lower your arm. You can raise and lower your elbow to get that tissue to move. You can also let your hand that is "hanging" over your other shoulder reach up and back a bit to get your serratus anterior to move mover a bit more.. Again, play around a bit with the motion and find out what works for you. It can only help!
C. Underside of Collarbone -
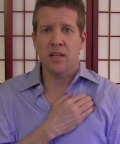
This a great place to use the hand-on-hand technique. You'll first be pressing your fingertips into the the tissue all along the underside of your collarbone (clavicle) to notice any tight/painful/tender tissue you may notice.
Once you've located a spot you want to work on, and you've got your fingertips on the spot, with your other hand pressing on those fingertips to add firm, but relaxed pressure, do the press-pull-release technique for 5 to 20 seconds on each spot. Go back and forth between spots if they are stubborn.
Releasing these muscles can be like magic if it's the source of your neck and shoulder pain, so take your time and do a good job here.
As always, you can mix in other ways to get that tissue to release, like using the press-hold-move technique. Press on a tight spot and move your arm up and down to get that tissue you are pressing on to move. I'm all for whatever works, so go for it!
D. Upper Outer Back -
We already did the tennis-ball-press technique on the tissue between your shoulder blade and spine. Now we are going to do that same technique on the muscle tissue that covers the back of your shoulder blade. The muscle is called your infraspinatus.
Once you find a spot that is tender when the tennis ball presses into it, you do press-hold-move technique. The easiest motion to do this is generally sliding your arm alternately toward your head and then toward your feet. Either along the wall or along the floor depending on whether you are standing or lying down.
Feel free to go back to any of the stubborn tight spots you've found in Step 3 and repeat the techniques. You may be pleasantly surprised that they now easily release.
Make a mental note of how much neck and shoulder pain relief Step 3 provided for you.
Self-Assessment Of
Neck and Shoulder Pain Relief
How much progress did you make after one pass through the videos?
What techniques seemed to provide the most positive benefits?
What areas were very stubborn? Do they need more work?
When do you plan on working on yourself again? Set a time, so you can keep progressing and get out of pain. You can do it now, later today, tomorrow. Just set a time, so you're more likely to do it.
More Neck and Shoulder Pain Relief Success Stories: "I've had neck and shoulder pain for several years now, with my neck often cracking. I've seen my own doctor and was refered for physio on severel occasions and nothing helped. After i tried your technique i got the first wave of relief in years. This is just to say thank you soo much." - Emma, United Kingdom "Hi Gary, I just had to e-mail you. You save me from a lot of back pain almost a year ago, now I'm doing your method for my neck and shoulder pain. THIS REALLY WORKS AND IS SO MUCH BETTER THAN PILLS. Thanks so much for your awesome website. I have told everyone about it. Will be using your techniques from now on for all pain." - Barb, Canada "Just found your sight last night, but I was disparate. My neck and shoulder had been hurting badly for five days. I tried your techniques and have had almost immediate relief. It seems too good to be true. Thank you so much!" - Stephanie, United States "Hello Gary, I just wanted to say thank you, i have sadly a neck and shoulder probleme with polyarthrite and my cervicles aren't in place because of an accident, i was used to having strong painkillers but now preganant i had to find something else. I did your neck and shoulder pain relief and i feel great !" - Sadie, France "As a 62 year old cellist I am always fighting neck and shoulder pain. I checked out your website before leaving for a week of intense music camp and can't believe the relief I have felt after watching your video just once. I will take a tennis ball to camp and will be using your techniques throughout the week. Thank you. Thank you. Thank you." - Mary, United States "Hi Gary- I am finding all kinds of relief with your techniques. I am totally astounded at what you teach. I had neck pain for two months until I sat down and did your neck and shoulder pain techniques and right then and there I was almost all the way to normal!" - Helen, United States "Thank you Gary for posting those videos about how to help ease Neck and shoulder pain. I Found those videos and instructions to be very helpful and effective. Once again, thank you so much :)" - Brian, United States "Your neck and shoulder techniques really changed my world. My pain was so intense, I couldn't turn my head, struggled to drive, play the piano, or my cello (I'm a music teacher.). I was taking Tylenol and Advil max doses every 4 hours and could not get relief. My husband was having to help me get out of bed. We considered the ER. I found your videos, did the neck and shoulder tech twice yesterday. Today I haven't had one pain pill! I am still tender to the touch but not in pain. I just finished round two for today, and am thanking God for you!" - Christina, United States
Copyright © 2011 - 2022 DiyJointPainRelief.com
MORE
Neck and Shoulder Pain Relief Pages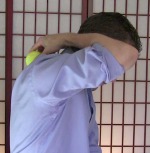
Stiff Neck Pain Treatment (Click Here) - the primary techniques you need to relieve your "stiff neck."
Pillows For Neck Pain (Click Here) -the 2 main factors to consider when choosing a pillow for neck pain relief.
Best Subscapularis Stretch - Learn this effective subscapularis stretch and manual release.
Return from this Neck and Shoulder Pain Relief page to the
Do-It-Yourself Joint Pain Relief Homepage
This Free Pain Relief Website
By Clicking On Your Favorite Icon Below:
Add Gary Crowley to your Google Plus Circles -
Google+ (click here)


