Knee Joint Pain Relief
Thousands of other people have already benefited from these videos, so please do go ahead and give them a shot.
Just follow along with the videos below.
Go directly to any video on this page with these links:
Intro,
Video 1,
Video 2,
Video 3 .
Pain Relief Success Story, From Mark:
"Wow...Followed your instructions on knee joint pain relief, and have been having great results. I play about 5-6 hours of tennis every day, so I was really worried about my increasing knee joint pain...Thanks so much for the help. Will pass along to my other tennis buddies!" Mark, United States
You can do it!
Click directly to any knee joint pain relief video on this page:
Intro,
Video 1,
Video 2,
Video 3 .
*Please Watch This Short Video First. Thanks.
Please visit the techniques page now, if you haven't already.
On the homepage I describe…in detail…the 3 Simple Steps and the 4 Basic Facts about your body that make it possible for you to provide your own joint pain relief.
Detailed Instructions For
Knee Joint Pain Relief
Click directly to any knee joint pain relief video on this page:
Intro,
Video 1,
Video 2,
Video 3 .
Step 1 alone may provide the knee joint pain relief you've been seeking……and I hope that happens for you....but please do go through all the videos regardless, so you can have the most stable and long lasting results as possible.
Here's what we're going to do:
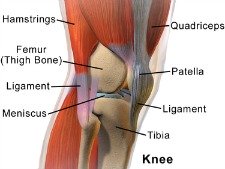
A. Front And Side of Knee Joint Pain Release -
We'll begin by addressing the tissue on the front of your thigh that usually corresponds to pain symptoms on the sides and front of your knee. Technique B. that follows is primarily for pain the the back of the knee.
Many of the muscles in your thigh are quite strong, so you'll want to be familiar with the hand-on-hand technique that allows you to provide much more pressure on the tissue without tiring out or straining your hands.
Investigate the tissue in the lower half of your thigh for tissue that is painful/tender with you press into it. Pay extra attention to the tissue directly above where you are experiencing pain. From the point of pain to about eight inches up your thigh there is a good chance to find the tight tissue that may be a big player in causing your knee pain.
Now do the press-pull-release technique on any tight tissue you find. You'll want to help yourself by adding the hand-on-hand technique while you do your work. It can make a big difference having that additional pressure.
Now widen your investigation to three inches on side of the entire area you just worked directly above the pain in your knee. And again, release any tight areas you find with the techniques you just did.
Incorporating the press-hold-move technique is also great. Just bend and straighten your leg while you press on the tight tissue in your thigh.
And feel free to work even higher up on your thigh if you desire. The more you release the happier your knee will be.
How much knee joint pain relief did this technique provide? I've had clients who've seen many well-intended experts with no knee pain relief to show for it……then they do this simple technique and their knee pain is suddenly gone.
B. Back of Knee Pain Release -
Your popliteus muscle and your plantaris muscle are found on the back of your knee. When they get tight they can torque you knee joint out of position and make it hurt.
Sit in a low chair, stool, or bench and put your foot flat on the floor.
Your two thumbs should fit quite nicely behind your knee. Now gently do a bit of investigating by pressing into the muscle tissue with your thumbs and see if there are any tight/painful spots.
Using your thumbs, do the press-pull-release technique. The tissue in the back of your knee usually responds pretty well, but you can also alternate in some press-hold-move technique by bending and straightening your leg. Do this especially if you run into any stubborn spots that just a bit more input to let go.
As with Step A, assess how much knee joint pain relief this work provides. This too is a very simple knee pain treatment that can sometimes provide instant relief.
Click directly to any knee joint pain relief video on this page:
Intro,
Video 1,
Video 2,
Video 3 .
These three simple stretches are going to help make sure the nerves that come out our your lower back and hips aren't being negatively affected by tight tissue and thereby negatively affect your knee.
Here's what we're going to do.
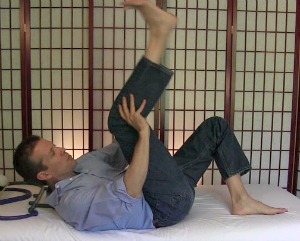
A. Reclined Hip Stretch -
This stretch is great for getting an overall stretch on the big strong gluteus muscles and their supporting cast of muscles in your hips.
Once you get the hand of this stretch you can do nice long sets of stretches, and/or active stretches to free your hips.
And switching back and forth from your left and right sides seems to work very well for me. A bit of release on one side, seems to encourage the other side to release as well.
If you are pretty tight in this area, feel free to do this stretch everyday, multiple times a day. You'll be glad you did.
Notice how tight you originally werer and how much knee joint pain relief this one stretch achieved.
B. Seated Hip Stretch -
Similar to the reclined stretch you just performed, you can do this stretch as often as you'd like. The more you do it, the quicker you will see how flexible your hips can be.
I would once again, encourage you do switch back and forth between your left and right sides while doing this stretch.
You will most likely notice that one hip is more tight than the other. In me, my right hip is always more tight and needs more time with this stretch. It's just from the way I sit at the computer and sit when I drive my car, so I just know my right hip will take more effort to get it released.
Also, never do you want to feel this stretch in your knee joint. You should feel it in your buttocks or your inner groin. Always adjust your position so that you do NOT feel this stretch in your knee joint.
Notice how much this stretched helped relieve your knee joint pain.
C. Hamstring Stretch -
For an entire video on just hamstring stretches, go here: Best Hamstring Stretches (click here).
That said, in order to protect your lower back while doing this stretch, you must ALWAYS flex your thighs. When you do this stretch correctly you will feel the stretch all the way up the backs of your legs and into your buttocks. You should not feel this stretch in your lower back.
It's also very important to get the most out of this stretch my NOT bending your knees when you do it. Many people cheat and bend their knees so they can get their hands closer to the ground, but when they bend their knees they lose the entire benefit of this stretch. Sooooooo....keep your legs straight during the entire stretch and you'll get the most out of this stretch.
Lastly, do notice how much this stretch helped alleviate your knee pain.
Click directly to any knee joint pain relief video on this page:
Intro,
Video 1,
Video 2,
Video 3 .
Here's what we're going to do:
A. Outer Shin Muscle Release -
Lie on your back bring your knee to your chest and hold it in position with both hands. The top outer half of your shin is a muscle called your tibialis anterior……the inner half is your shin bone. We're going to release this muscle so it doesn't pull on your knee joint.
Place your fingertips on the muscle just below your knee joint and use the hand-on-hand technique to do the press-pull-release technique.
"Press, pull and release" the tissue continuously, while you flex your foot up and down. You'll feel the muscle move under your fingertips as you move your foot. Do this on any tender spots from your knee to your ankle on this muscle. Pay special attention to the area at the top of this muscle closest to your knee, which quite often needs to be released.
You can also move your foot up and down and mix in some of the press-hold-move technique if it's possible for you to perform it.
Repeat the process at least one more time before moving on. Take your time and feel free to take breaks if necessary.
Was your knee joint pain suddenly improved from this one technique?
B. Outer Thigh Muscle Release -
We're going to be releasing your outer thigh muscle, a muscle known as your vastus lateralis. It's located on the outer 1/3 of your thigh.
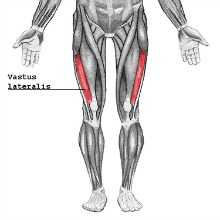
Just take a moment and press your fingertips into the tissue along the outer edge of your thigh. From your knees to about 2/3 up your thigh, follow the path of your vastus lateralis and notice any painful/tender tissue when you press on it.
For any of those tight spots you find, do the press-pull-release technique on that tissue until it releases.
If the tissue is particularly stubborn, you can go work on other tissue for a while and then come back later to give it another try. Or you can try some press-hold-move technique on the tissue by bending and straightening your leg while you apply pressure.
And how much knee joint pain relief this one technique provides for you?
C. Side of Leg Release -
And now that you've got your technique down, you can do the exact same techniques you just did on your outer thigh, except now do them along the very side of your leg, all the way up to your hip bone.
The big long tendon that attaches to the outside of your knee is call your IT Band (iliotibial band) and the muscle it attaches too at the very top of your hip is called your Tensor Fascia Latae.
The Tensor Fascia Latae may benefit from the tennis-ball-press technique along with the press-hold-move technique.
How much knee joint pain relief does working on this area provide.
D. Inner Thigh Release
Releasing your adductor muscles (inner thigh muscles) will only help balance out your knee joint.
We'll primarily be using the press-hold-move technique along with thehand-on-hand technique to release any tight tissue you find in your inner thigh area.
Do the best you can to get as much release as possible, but also remember the inner thigh stretch that we do next will also help release these same muscles.
Did manually releasing your adductors substantially relieve your knee joint pain?
E. Inner Thigh Stretch -
There's nothing like a good groin stretch, so if you'd like to see an entire video just on stretching your groins then here it is: Best Groin Stretches (click here).
If you feel comfortable with the stretch I've shown in the the video on this page, then that's great. But, if you're having a bit of trouble really getting a good deep stretch on those adductors then I'd strongly encourage you to check out the page recommended above. Yes, I'm very pleased with my "best groin stretches" page!
F. Calf Stretch (do this stretch slowly) -
The first key to this calf stretch is to always go SLOWLY.
The second key is to always keep your calf muscle ENGAGED, even when (especially when!) you are in the stretch segment of the stretch.
And, as I show you in my new Best Calf Stretches Video, which I don't show you in this video, it's good to stretch your soleus calf muscle first. Then, when you stretch your gastrocnemius muscle, which I show you in this video, it can be even more effective.
Assess the amount of knee joint pain relief you get from stretching your calf.
Self-Assessment Of
Knee Joint Pain Relief
It's time to be very honest and assess your results.
How much has your pain improved?
Was there one or more techniques that really seemed to help the most?
What areas could definitely use more work in the future?
Go through the list of all the techniques above and make a note of which ones you need to do more of. Do them again, and then assess your improvement once more.
Repeat this process until you are out of pain.
Return from this Knee Joint Pain Relief page to the
Do-It-Yourself Joint Pain Relief Homepage
Additional Knee Pain Pages:
Pain In Back Of Knee - A Quick Fix - for those whose knee pain is exclusively in the back of their knee.
Exercises For Chondromalacia Patella Knee Pain - 4 Videos show you how to eliminate your chondromalacia patellae today.
Another DIY Knee Joint Pain Relief Testimonial:
I sent a small donation to help with your website. I've written to you before but I want to tell you again how much you have helped my knees. I wish this information was available 20 years ago. I still have problems after sitting at the computer for a while but usually am able to work out the kinks. I just hope my knees are not damaged beyond repair after all these years of dealing with this problem. I am using your Chond. Patella knee pain videos. Seems like everything I learned in therapy several years ago was wrong. Anyway, thanks again. If you have any other suggestons for me to keep my knees healthy I would love to hear them. I will send donations from time to time to help you reach other people with this." - LeeAnn, Country Unknown
This Free Pain Relief Website
By Clicking On Your Favorite Icon Below:
Add Gary Crowley to your Google Plus Circles -
Google+ (click here)
Copyright © 2011 - 2022 DiyJointPainRelief.com


