Middle Back Pain Relief
Just follow along with the videos below.
Go directly to any Middle Back Pain Relief video on this page with these links:
Intro,
Video 1,
Video 2,
Video 3 .
Pain Relief Success Story, From Mayan:
"Amazing, pain that has been growing for over a year is gone after no more than 5 min of the first step. Thank you so much." Mayan, Country Unknown
You can do it too!
Click directly to any pain relief video on this page:
Intro,
Video 1,
Video 2,
Video 3 .
*Please Watch This Short Video First. Thanks.
Please visit the techniques page now, if you haven't already.
On the homepage I describe…in detail…the 3 Simple Steps and the 4 Basic Facts about your body that make it possible for you to provide your own joint pain relief.
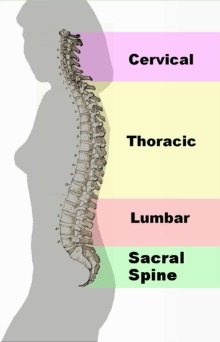
Detailed Instructions For
Middle Back Pain Relief
Click directly to any pain relief video on this page:
Intro,
Video 1,
Video 2,
Video 3 .
Here's what you're going to do:
A. Upper Back Work -
Using the tennis-ball-press technique position a tennis ball in the space between your scapula (shoulder blade) and your spine (rhomboid muscle, trapezius muscle) while lying on the floor or leaning against the wall.
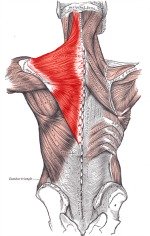
Basically, just use the tennis ball to press on the tissue between your spine and your scapula from the very bottom of your neck to your mid-back pressing on any tender spots while you move your arm.
Do this on BOTH sides of your upper back, especially on the rhomboid muscle between your spine and shoulder blade.
Repeat this Step 1, two to three more times before moving on to Step 2. You may not get them all to release, but do the best you can before moving on the Step.
How much middle back pain relief did this one technique provide.
B. Middle Back -
Using the tennis-ball-press technique place any sports ball you desire between your scapula and your spine (rhomboid muscle, trapezius muscle, latisimus dorsi). Then the choice is yours whether you want to be on the floor lying down or standing where you will use the wall.
Basically, just use the tennis ball to press on the tissue between your spine and your shoulder blade from the very bottom of your neck to your mid-back pressing the tender spots as you move your arm.
Do this on BOTH sides of your middle back, especially on the rhomboid muscle between your spine and shoulder blade.
Repeat this Step 1, two to three more times before moving on to Step 2. You may not get them all to release, but do the best you can before moving on the Step.
How much middle back pain relief does this one technique provide?
Click directly to any pain relief video on this page:
Intro,
Video 1,
Video 2,
Video 3 .
In Step 1, you released some big strong muscle groups, so now we can release some smaller muscles along your spine.
Here's what you're going to do:
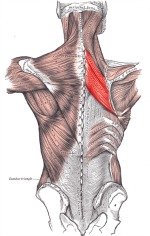
A. Upper Spine -
Using the floor or leaning back into the wall do the tennis-ball-press technique.
And then simply do the press-hold-move technique. You can even bend your spine a bit as move your arm, just as long as you maintain pressure on the tender spot.
Do this on BOTH sides of your back.
B. Middle and Lower Spine -
Now repeat what you just did on your upper back. Use tennis-ball-press technique position a tennis ball right next to your spine (erector spinae muscles) .
Do this on BOTH sides of your back.
Again, how much middle back pain relief did this one technique provide?
Click directly to any pain relief video on this page:
Intro,
Video 1,
Video 2,
Video 3 .
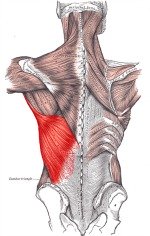
A. Side of Rib Cage -
Now we need to release your serratus anterior muscle. It's way over on the side of your ribcage, but it can still cause problems for your middle back if it's tight.
Reach across your ribcage with your opposite hand and press your fingertips into the side of your ribcage near the bottom of your scapula. Poke around and notice if there is any tight tissue on top of your ribs in this area.
Once you find some, do the press-pull-release technique first and see what tight tissue you can get to release.
Next, use the press-hold-move technique by pressing into the tight tissue and raising your arm up over your head.
Pay attention to how much this helps your pain.
Self-Assessment Of
Middle Back Pain Relief
Was there one specific middle back pain treatment that instantly relieved your pain? Remember what worked best for you, so you can do that first next time you need it.
Are you still experiencing some middle back pain?
Which muscles are still tender (that means they are too tight!) and could use some more work?
Go back and repeat those techniques that seem to need a few more rounds. You may be pleasantly surprised at the results you get now that you've released other muscles that may prevented them letting go.
Investigate a bit and you'll eventually find which techniques work best for you to provide the best middle back pain relief. Then you'll be able to fix yourself whenever you desire!
This massage tool release (click here) is a great technique you can add to your middle back pain relief program.
Return from this Middle Back Pain Relief page to the
Do-It-Yourself Joint Pain Relief Homepage
This Free Pain Relief Website
By Clicking On Your Favorite Icon Below:
Add Gary Crowley to your Google Plus Circles -
Google+ (click here)
Copyright © 2011 - 2022 DiyJointPainRelief.com


