Hand Pain Relief
The videos below show you some very simple techniques that are also very effective techniques.
Just follow along with the videos below.
Go directly to any Hand Pain Relief video on this page by clicking these links:
Intro,
Video 1,
Video 2,
Video 3 .
Pain Relief Success Stories
"Thank you so much for your techniques without them I was having unbearable pain in my hand and around my middle finger following a bus accident... I feel so lucky to have found this sight. The pain was horrible..." Teril, United States
"Recently started a new job bending steel rebar. After the first few weeks the pain in my hands was unbearable. Tried your... videos and was amazed at the results. Thanks for making this free and allowing people to benefit from your knowledge. Just wanted you to know it was appreciated." Alistair, Canada
You can do it too!
Click directly to any pain relief video on this page:
Intro,
Video 1,
Video 2,
Video 3 .
*Please Watch This Short Video First. Thanks.
Please visit the techniques page now, if you haven't already.
On the homepage I describe…in detail…the 3 Simple Steps and the 4 Basic Facts about your body that make it possible for you to provide your own joint pain relief.
Detailed Instructions For
Hand Pain Relief
Click directly to any pain relief video on this page:
Intro,
Video 1,
Video 2,
Video 3 .
Do-It-Yourself Hand Pain Relief can often be simple if you are just shown the correct techniques and you take your time.
Here's what we're going to do:
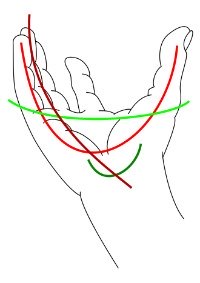
A. Forearm Release With Thumb -
We're going to begin by using a very powerful technique called the press-hold-move technique. And as it's name implies, what you want to do is find some tight tissue (painful and tender when pressed on), press on it firmly with your thumb but only at a level you can relax into, while you make the tissue you are pressing on "move." In this case you make the tissue move by opening and closing your fist.
When you feel the tissue become less painful and more supple that means it has released and you can move on to find another tight spot and repeat the process.
Was there substantial hand pain relief from this one technique?
B. Forearm Release With Opposite Forearm -

We'll use the press-hold-move technique again, but this time press the part of your forearm closest to your elbow into any tight tissue you find and then open and close your fist, and flex your wrist up and down.
Was there noticeable hand pain relief from this one technique.
C. Top of Forearm Release With Fingertips -
Not surprisingly, the press-hold-move technique is used once again to release the top of your forearm.
Use your fingertips to press into any tight tissue as you flex your wrist up and back.
D. Top of Forearm Release With Point of Elbow -
We're going to use press-hold-move technique one more time, but now use the point of your elbow to GENTLY get into any really stubborn spots on the top of your forearm.
Flex your wrist back and forth the make the tight tissue move under your pressure.
How much hand pain relief has occurred?
Click directly to any pain relief video on this page:
Intro,
Video 1,
Video 2,
Video 3 .
Here's what you're going to do:
A. Lower Neck and Shoulder Release -
With your hand that is not in pain reach across the front of your neck and let your fingertips "hang" on the intersection the back of your neck and shoulder. You should be pressing into this tissue on the same side of the body that your hand pain is on. Feel the tissue on the lower portion of your neck and down and out about six inches on the top of your shoulder.
If you feel any tender muscle tissue do the press-hold-move technique on any tender spots until they release.
With your neck you can nod "yes" or turn your head back and forth in a "no" motion to make that tissue move under your fingers.
With the top of your shoulder, shrugging your shoulder backward with your elbow raised high will make that tissue move as you press on it.
Do the same technique on the other side of your body. If you can do it with the hand that hurts it may be easier, if not do it with hand that doesn't hurt and it will be fine.
Notice how much hand pain relief this technique creates for future reference.
B. Underside of Collarbone -
The underside of your collarbone as muscle groups that can affect the nerve pathways that run down to your hands, so we want to make sure that tissue is free and not inappropriately tight.
Start by feeling into the tissue with your fingertips on the entire underside of your collarbone to notice any tight/painful/tender tissue.
Then use the press-hold-move technique with the additional assistance of the hand-on-hand technique to release any tight tissue in the area.
How much hand pain relief did this provide?
C. Upper Back -
The tennis-ball-press technique. combined with the press-hold-move technique are an extremely effective way to release all the tight tissue in your entire upper back area.
Make sure and cover the entire area from your spine all the way out to the most outer edge of your shoulder blade on both sides of your body.
Notice how much hand pain relief did this provide?
D. Back of Upper Arm Release
We're going to work on the back of your upper arm on the side that your hand hurts. Take your opposite hand and reach across your body and grab the back of your upper arm. These muscles are called your triceps. Press your fingertips into the on the back of your arm from you elbow all the way up to your shoulder. Notice any tender tissue.
Press your fingertips into any tender spots and do the press-hold-move technique by straightening and bending your elbow joint.
You can also do the press-pull-release technique on any tender spots. It also tends to work well in this area.
Notice how much hand pain relief this technique creates for future reference.
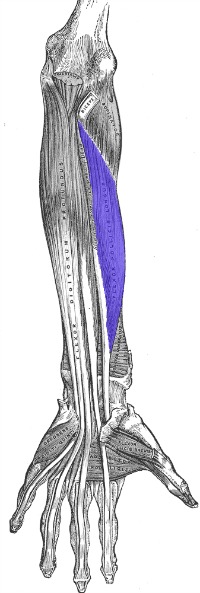
E. Release Elbow Joint
Using your thumb, we're going to release your brachioradialis muscle that is located on the outer front portion of your elbow joint.
The press-hold-move technique is very effective by bending and straightening your elbow as you apply gentle but firm pressure on any tight tissue.
You can also add the press-pull-release technique to help this muscle release.
How much hand pain relief did this provide?
Click directly to any pain relief video on this page:
Intro,
Video 1,
Video 2,
Video 3 .
So here's what we're going to do:
A. Palm of Hand Release -
The press-hold-move technique done with your opposite thumb is a great way to free the tissue in the palm of your hand.
Simply press into the tissue in your palm and when you find tight/tender/painful spots, then press on them firmly while you open and close your fingers and thumb. Do this everywhere you find tight tissue.
The press-pull-release technique can be used a bit as well if you find it helps.
Was there dramatic or substantial hand pain relief from any one tissue release in this area?
B. Back of Hand Release -
This very similar to the work you just did on the palm of your hand, except we'll be using your fingertips to work on the back of your hand with the press-hold-move technique.
With your hand relaxed,press your fingertips into the tissue between the bones on the back your hand. When you notice a tender spot to the press-hold-move technique by pressing while closing your hand into a fist and then opening your hand as wide as you can by flexing your fingers back toward the back of your hand.
It's also good to investigate for tender tissue while opening and closing your hand. When you find a tender spot, just do the press-hold-move technique as described in the paragraph above.
Was the hand pain relief from Step 3 substantial?
Return from this Hand Pain Relief page to the
Do-It-Yourself Joint Pain Relief Homepage
More Hand Pain Relief Success Stories:
"I just had to write you! I've been dealing with severe thumb and top of hand pain for three days. Out of desperation I tried your techniques. Almost immediately the pain subsided!...I didn't believe it would work since I was thinking it was from years of working on the computer and was far more serious....I will be telling everyone I know about your site. ...Thank You so much!" - Theresa, Country Unknown
"Thank you very much Gary....It really works now my dad is perfectly alright. I really worried a lot but now I am very happy. God bless you with happy long life. Thanks a lot." - Amma, YouTube Hand Pain Relief video comments
"thank you a lot! it helped me with my huge hand pain!!" - Iuliana, YouTube Hand Pain Relief video comments
This Free Pain Relief Website
By Clicking On Your Favorite Icon Below:
Add Gary Crowley to your Google Plus Circles -
Google+ (click here)
Copyright © 2011 - 2022 DiyJointPainRelief.com


