Lower Back Pain Relief

Just follow along with the videos below. It doesn't really matter if it's lower right back pain, lower left back pain, or the type of low back pain that goes across your entire back……the formula to fix it remains the same.
Go directly to any Lower Back Pain Relief video on this page:
Intro,
Video 1,
Video 2,
Video 3 .
Pain Relief Success Story, From Ramona:
"...I have suffered from severe pain for over ten years. Lately, it has gotten so bad that I could barely lift my right foot to wash it in the shower....Desperate, I looked up lower back pain...and found your tapes. I did as you instructed and the second day after following your descriptions, I was pain free. I am on day two and still pain free....To be able to cook, sweep, iron, and still keep going without the pain and having to sit down numerous times is a miracle for me. Your tapes are a miracle I have prayed for. Thank you so much and bless you, bless you!" Ramona, United States
You can do it too!
Click directly to any pain relief video on this page:
Intro, Video 1, Video 2, Video 3 .
*Please Watch This Short Video First. Thanks.
Please visit the techniques page now, if you haven't already.
On the homepage I describe…in detail…the 3 Simple Steps and the 4 Basic Facts about your body that make it possible for you to provide your own joint pain relief.
Detailed Instructions For
Lower Back Pain Relief
Best Groin Stretches (click here) - will help relieve lower back pain
"Release The Front Of Your Back" (click here) - great additional information and techniques.
"Tennis Ball Tune-Up" (click here) can also be added to your program, especially if you feel like your hips are still tight after doing the techniques below.
Click directly to any pain relief video on this page:
Intro,
Video 1,
Video 2,
Video 3 .
It's important to go through this entire sequence of techniques in all the videos on this page. Even if one single technique happens to dramatically relieve your lower back pain, continue through the serious, so you can have as stable a fix as possible.
Here's what we're going to do:
A. Inner Spinal Muscle Release -
We're going to begin, by checking in with the lower back muscles closest to the spine. We'll be using the press-hold-move technique by doing a tennis-ball-press technique on any tight tissue we find.
Quite simply, lie on a tennis ball with the ball just to the side of your vertebrae. You can start at the very bottom of your lower back just above your tailbone and go up about six inches. Press the tennis ball into this tissue investigating for any painful/tender tissue. Again, you'll want to do this on both sides.
Once you've found a tender spot, then do the press-hold-move technique by pressing into the ball with your body weight while you raise and lower your leg to get the muscle the ball is pressing into to move a bit while you press on it.
Do the right and left side of your lower back, even if only one side hurts.
Was their noticeable lower back pain relief from this specific technique?
B. Outer Spinal Muscle Release -
Simply repeat what you did in Step 1A (above), except now position the ball two to three inches out from the spine. You'll just be a bit wider than where you just were.
Again, find tight tissue and release it using the tennis ball like we just did.
Once you've done one side of your back repeat it on the opposite side, regardless of which side your pain is on.
Assess the amount of lower back pain relief this technique provides.
C. Tailbone Release - Now that you've got it down, this Step 1C, should be pretty easy. Use the tennis-ball-press technique to find any tight tissue on your sacrum.
Your sacrum is definitely a bone and while there is not a lot of tissue on the bone, there can be a kind of "buildup" of fascia and tendonous tissue on the sacrum that is basically just the tissue being inflamed. I'd generally recommend only to use a tennis ball here, since there is not a lot of cushion from the tissue, but use your bodyweight to press into the tissue and find the tight spots.
People who drive a lot may have a lot of inflammation on the main body of the sacrum, and others may have it on the edges of the sacrum, but wherever it is, once you find a tender spot, do a press-hold-move technique on that tight spot.
And how much lower back pain relief did this technique provide?
Click directly to any pain relief video on this page:
Intro,
Video 1,
Video 2,
Video 3 .
This is a fantastic stretch for lower back pain relief. Please take the time to do this properly. You'll be glad you did.
Here's what we're going to do:
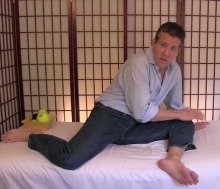
A. Passive Low Back Stretch -
This is one of my very favorite stretches for the lower back because if you do this properly, it can GENLTY get at some deep muscle groups that you might otherwise never be able to get at.
The video of me doing this stretch is definitely the way to learn to do this stretch, so let me just emphasize that this stretch should provide a GENTLE traction on your lower back. And that means, you should be pretty darn comfortable once you are in the resting position for this stretch. You should be able to hang out and chat, etc. because you are just RELAXING into the stretch.
The 3 most important things that some folks miss are: 1. Your buttocks should be gently touching the floor. If your buttocks are hanging in midair when you are in your final position then it's TOO MUCH traction on your lower back, so move forward just a bit, so your buttocks can reach the floor (or your cushion is too high, so you may need to lower your cushion.
2. You absolutely want to support your legs with some pillows. It will help you get more gentle traction on your back.
3. Come out of the stretch slowly. Take your time. Put your knees together first. Then turn on your side to get up.
That's it. Now go give it a try.
How much lower back pain relief this one stretch provide for your body?
Click directly to any pain relief video on this page:
Intro,
Video 1,
Video 2,
Video 3 .
For all of these big muscle groups in your upper legs and hips, it's good to understand that, like the rigging (ropes) on a sailboat, these muscles can pull on the pelvic bones they attach to and cause your back pain. Just because we aren't working on your lower back, don't think we aren't working on very important muscle groups to relieve your lower back pain.
So here's what we're going to do:
A. Outer Thigh Muscle Release -
The vastus lateralis muscle is so very important to check out if you have back pain. It plays a role is so many of my clients back pain.
As I show you in the video, just press into the outer third of your thigh from your knee to about 3/4 of the way up your thigh. When you find tight tissue, use a press-pull-release technique with the very important additional pressure provided by the hand-on-hand technique.
Now do the other leg in exactly the same manner.
Be thorough.
How much lower back pain relief did this one technique provide for you?
B. Side of Leg Release -
You'll use, once again, the hand-on-hand technique with the press-pull-release technique on the very side of your leg, from your knee all the way up to the very side of your hip bone.
The tennis-ball-press technique with the press-hold-move technique is a useful option at the very top side your hip bone on the muscle called your tensor fascia latae.
Was there much lower back pain relief from this release of tight tissue?
C. Tennis Ball Release of Hips -
The tennis-ball-press technique and the press-hold-move technique. is a great way to release BOTH hips.
While lying on your back on a cushioned mat or a carpeted floor place a tennis ball under one side of your buttocks. From your tail bone all the way over to your leg bone, and from the top of your buttocks all the way down where it meets the back of your leg……this entire area made of muscles! If these muscles are tight they can be the sole cause of your lower back pain.
Place the tennis ball under any tender spots and move your one leg, or both legs, or upper body in a way that increases the pressure on that spot with your bodyweight. For the upper sections of your buttocks you can bend your knees and raise your legs up toward your chest while the ball remains under your hip. For lower buttocks areas you can sit up so your upper bodyweight increases the pressure on any tender spots.
You'll have to play around a bit for each spot you find, but you'll notice right away what body position increases the pressure on the tender spots.
Now just get to work, finding and releasing any inappropriate tension you may find.
How much lower back pain relief did this one technique provide. Hopefully, a lot.
D. Hip Stretch 1 and Hip Stretch 2 -
Hip Stretch 1 -
This reclined hip stretch is a really, really good stretch. Do it as much as you desire. Switch from side to side and notice how each side releasing helps the opposite side release as well.
Notice how much lower back pain relief this one technique provides.
Hip Stretch 2 -
The most important thing to remember with this stretch is that you NEVER want to feel this stretch in your front knee. If you do please take the time to find a good position for your front foot that allows you to do this stretch without you feeling it in your knee.
Assess the amount of lower back pain relief these stretches provided.
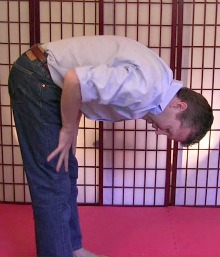
E. Hamstring Stretch -
First, I have a new video entirely dedicated to hamstring stretches. If you're interested: Best Hamstring Stretches (click here)
That said, the two most important things to remember when doing the hamstring stretch in this video:
1. Always keep your legs straight. Do Not Bend Your Knees.
2. Always flex your thighs when doing this stretch.
*You can also add this additional "release the front of your back" - lower back pain remedy (click here) to your program, especially if some of your lower back pain still lingers at this point.
Remember to notice how much this hamstring stretch helps to relieve your lower back pain.
Self-Assessment Of
Lower Back Pain Relief
Was there one particular technique that gave you the most relief?
Is there one area that was particularly stubborn and could use more work?
Go through your entire session and try to notice the most effective things you did and the areas you will need to go back to in order to improve your results.
Keep in mind what worked for future use if you ever need it.
More Lower Back Pain Relief Success Stories:
"Hi Gary. I want to thank you for taking the trouble to make this web site. I have had lower back pain since jarring my spine and twisting awkwardly a year ago. Several visits to the physio eased but did not resolve it, and it was starting to get worse when I found your site. The first session with your videos immediately reduced my pain and a week later, after following your routine daily, I am pain free. I still have some residual tension, but that is also going away. The surprising thing is that the physio did not work on some of the areas that make most difference, like thighs and buttocks. Thank you!" - Adrian, United Kingdom
"I just want to THANK you for your website. I have suffered from tailbone/hip/lower back pain for about 4 years. I've been to my doctor, chiros, orthopedic docs, I've had shots in the tailbone, i bought 3 different coccyx cushions for different areas (work, car, home), had xrays, nothing wrong, lots of tears, discouragement, prayers, depression, got addicted to pain meds, bought red light therapy devices, massage tools, tens unit, all to no avail. And i read that STRETCHING is all it takes?? I was skeptical, but after less than a week of doing your stretches on the hip video, the pain reduced greatly, and now, about 2 weeks later, i have NO PAIN. no drugs, no devices have been used, just stretching. You are a lifesaver and i want to truly thank you, i have my life back. i will share this website with others who have the same problems as i did. I am angry that doctors dont tell me that this huge muscle can be the culprit, WHICH THEY SHOULD KNOW, no, they want the business is all. well no more docs for me. thank you yet again!" - Diane, United States
More
Lower Back Pain Relief Pages:
Best Groin Stretches (click here)
Lower Back Pain Relief Exercises With A Stick (click here)
Sciatica Pain Relief(click here)
Sacroiliac Joint Pain Relief(click here)
Exercises For Sacroiliac Joint Pain(click here)
Pelvic Girdle Pain Relief(click here)
Lower Back and Buttock Pain Relief(click here)
Running Lower Back Pain Relief(click here)
Release The Front Of Your Back(click here)
Tennis Ball Tune-Up(click here)
Massage Tool Release For Lower Back(click here)
Lower Back Pain Stretches(click here)
Back Pain Lower Right Side - Quick Fix(click here)
Back Pain Lower Left Side - A Quick Fix((click here)
Best Hamstring Stretches (click here)
Return From This Lower Back Pain Relief Page
To The Do-It-Yourself Joint Pain Relief Homepage
This Free Pain Relief Website
By Clicking On Your Favorite Icon Below:
Add Gary Crowley to your Google Plus Circles -
Google+ (click here)
Copyright © 2011 - 2022 DiyJointPainRelief.com


