Pelvic Girdle Pain Relief
All you have to do is just follow along with the videos. The techniques I'm about to show you are very simple.
Go directly to any Pelvic Girdle Pain Relief video on this page by clicking these links:
Intro,
Video 1,
Video 2,
Video 3,
Video 4 .
DIY Pain Relief Success Story:
"... I have continued to do the techniques you demonstrate on your website (Pelvic Girdle Pain Relief). This video has helped me alot... and I reckon I am not far away from being completely pain free. There is just a minor pain at the top of the buttock that I am confident I will release using your techniques at any time... I can't thank you enough for providing your very effective, easy to follow exercises on your website as this has helped me be able to go into army selection feeling fit and confident in my body which will give me the best chance of passing. Thanks again, and keep up the good work." - Steven, Scotland
This short introductory video is a great place to start.
Click directly to any pain relief video on this page:
Intro,
Video 1,
Video 2,
Video 3,
Video 4 .
*Please Watch This Short Video First. Thanks.
Please visit the techniques page now, if you haven't already.
On the homepage I describe…in detail…the 3 Simple Steps and the 4 Basic Facts about your body that make it possible for you to provide your own joint pain relief.
Detailed Instructions For
Pelvic Girdle Pain Relief
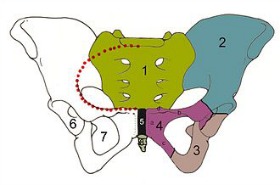
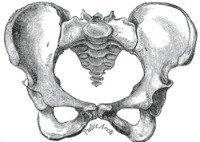
For our purposes think of your pelvic girdle being made up of 3 large pieces of bone: the sacrum (tailbone) and your two ilium (hip bones). Sections 2, 3, and 4 above are all one piece of bone. Thus, affecting any area by releasing a tight muscle can dramatically affect your entire pelvic girdle..
Above: 1. Sacrum, 2. Ilium, 3. Ischium, 4. Pubic bone, 5. Pubic symphysis, 6. Acetabulum, 7. Obturator foramen, 8. Coccyx
Click directly to any pain relief video on this page:
Intro,
Video 1,
Video 2,
Video 3,
Video 4 .
Here's what we are going to do:
Do the tennis-ball-press technique on any painful/tight/tender tissue you find in your buttocks.
Make sure to investigate both sides. I generally will do one side at a time going from bottom to top, but whatever method you choose just do a thorough job. This alone could immediately relieve your pain, so do a good job.
How much pelvic girdle pain relief did this technique provide?
Click directly to any pain relief video on this page:
Intro,
Video 1,
Video 2,
Video 3,
Video 4 .
Here's what we're going to do:
A. Inner Spinal Muscle Release -
Lie on your back and place a tennis ball under your low back, right next to your spine where your lower back meets your hip bones. Let your bodyweight press on the tennis ball and notice any tender spots from the top from the lowest part of your lower back all the way up to your lowest rib, which is about 4 to 6 inches.
When you find a tender spot, lift your leg that is on the same side of your spine as the ball. If you lift your leg enough you should feel the muscle tissue under the ball move. Lift and lower your leg a few times and you should feel the tight tissue release as the spot becomes less tender.
Do This same motion all the way up to your lowest rib, and then repeat this process on the other side. Notice the movements that your body seems to like for each spot, it's the "Oh, that's a good one!" feeling. It's not just pain, it's the feeling of tension that needs to be released and you're on it, so stick with it for a few seconds.
Again, move your leg, flex and relax, twist your spine while the ball presses on the muscles. When you feel the muscle move under the pressure of the ball then you know you're doing it properly.
Notice how much pelvic girdle pain relief this specific technique provides.
B. Outer Spinal Muscle Release -
Now, reposition the tennis ball 2 to 3 inches from your spine. Repeat the process you just did in Step 1A with this area. Do both sides of your spine. Yes, you might be re-doing some your low back muscles, but if they're still tight then they could use a little more work.
Repeat this same process on the other side of your back.
Notice how much pelvic girdle pain relief this technique provides.
C. Tailbone Release - Now to the tennis-ball-press technique on your tailbone. Locate some tight tissue, and then use your bodyweight to press the tennis ball into the spot. Then do the press-hold-move technique by moving your leg so that your tailbone moves under the pressure being applied by the tennis ball.
Notice how much pelvis pain relief this technique provides.
Notice overall how effective Step 1 has been at providing the pelvic girdle pain relief you are seeking.
D. Outer Hip (Tensor Fascia Latae) Tennis Ball Release -
Take a moment to locate the outer and upper most edge of your hip bone. If you poke your fingers into the tissue just below, that is your Tensor Fascia Latae muscle that can pull your hip down and out of position if it is tight.
Put a tennis ball on the floor and lie on it so it presses directly into your Tensor Fascia Latae Muscle. While keeping the ball pressing into one tender spot at a time, do the press-hold-move technique.
Do both sides of your body.
Notice how much pelvic girdle pain relief this one technique provided.
Click directly to any pain relief video on this page:
Intro,
Video 1,
Video 2,
Video 3,
Video 4 .
Here's what we're going to do:
A. Reclined Hip Stretch
Lie on your back, with your knees bent and your feet flat on the floor. Cross one leg over the other so your ankle is resting on the knee of the other leg. Now, with one hand grabbing the ankle that is resting on your knee and your other hand grabbing the knee of that same leg, pull that leg toward your chest.
You will feel this pull on all those muscles in your buttocks that you were just releasing with the tennis ball. Pull on your leg, then let go a bit, pull again, relax a bit, and you'll feel the muscles stretch a bit each time you do this. Do this for a minute or so.
Do the same thing on the other side. Then go back to the first side. Alternate sides a few times and you'll notice improvement as you return again to either side and stretch it.
How much pelvic girdle pain relief does this one technique provide? Also, notice tight areas, then go back and do the "sports ball release" from Video 1 on those particular spots.
B. Seated Hip Stretch
Hip Stretch 2 - Sit on the floor with you one leg bent at a 90 degree angle in front of you, and the other leg at a 90 degree angle behind you. Lean forward over your front shin and notice that you'll feel a stretch deep in your buttocks. You do NOT want to feel this stretch in your knee, so if you do feel it in your knee then move your foot higher or lower so you do not feel it in your knee.
Lean over your knee, then shin, then ankle and notice the different areas you feel being stretched. Most likely you'll feel the deepest stretch when you lean over you ankle.
Do this stretch on one side for a minute or so, then switch to the other side. Do three sets, at least, before moving on.
Notice how much pelvic girdle pain relief this one technique provided. Also, notice tight areas, then go back and do the "sports ball release" from Video 1 on those particular spots.
C. Twisted Hip Stretch
Sit on the floor with legs out straight in front of you.
Cross one leg over the other and bring the ankle of the top leg to where it rests on the outside edge of your opposite knee (or as close as you can get).
Now take your hand on the same side of your body as your bent leg and put it behind and out to the side a bit on the floor to support yourself.
And then take your elbow on the side of your body with the straight leg and reach it over your bent knee.
Now press your elbow into your knee so you feel a stretch in your buttocks.
Do both sides of your body about three times.
Notice how much pelvic girdle pain relief this one technique provided. Also, notice tight areas, then go back and do the "sports ball release" from Video 1 on those particular spots.
Click directly to any pain relief video on this page:
Intro,
Video 1,
Video 2,
Video 3,
Video 4 .
Release The Front Of Your Back
Here's what we're going to do:
Inner Hip Release
We're going to release a muscle called your iliacus the attaches to the inside of your hip bones. It's a muscle, just like any other muscle, so when it's tender it means it's too tight. When you release it you may find it's your instant lower back pain remedy.
Lie on your back with your knees up and your feet flat on the floor. Reach down and find your hip bone at the lower side of your abdomen. Come to the inside of your hip bone and press on the muscle tissue that attaches to the inner side of your hip bone. From the top of your hip bone all the way down to your pubic bone press on the muscle tissue and notice any tender spots. Do the press-pull-release technique combined with the hand-on-hand technique on any tender areas.
You can also cross one leg over the other or let your leg hang out to the side to get different angles of access to some areas (as shown in the video).
Repeat this entire process on the other side of your body.
Notice how tender the tissue was in this area and how much pelvic girdle pain relief or other symptom relief you experience from doing this inner hip release.
Side of Spine Release
Next in line is a muscle called your psoas that runs down the sides of the front of your spine. It too is a common cause of lower back pain. It's a very strong muscle so releasing it is often the lower back pain remedy you've been looking for.
While still lying on your back with your knees up and your feet flat on the floor, take the tips of your fingers and find your pubic bone. Move up about an inch from your pubic bone and about an inch to one side of your midline (your belly button is a good midline marker) and gently but firmly press into your belly.
Now "tuck your tailbone" up and down a little bit. It's important that you do NOT engage (tighten) your abdominal muscles while you do this or you'll push your fingertips out of your belly. It seems to help if you push into your feet just a bit when you tuck as it seems to make it easier not to engage your abdominals.
Try to find the place where you can feel your psoas muscle moving under your fingertips. It may or may not be tender where you are pushing but I want you to at least locate the psoas muscle by making it move.
Now you just do the press-hold-move technique with a modified hand-on-hand technique to release your psoas muscle on both sides.
Watching the video for this technique should clarify much of this written description.
Notice how much tension you found in this area and how much pelvic girdle pain relief you experienced from doing it.
Return from this Pelvic Girdle Pain Relief page to the
Do-It-Yourself Joint Pain Relief Homepage
To visit Symphysis Pubis Dysfunction SPD Help (click here) - five simple follow-along videos to get rid of your SPD.
To visit the main Lower Back Pain Relief page (click here)
To visit the main Hip Pain Relief page (click here)
To visit the Best Groin Stretches page (click here)
To visit the Best Hamstring Stretches page (click here) - find the best hamstring stretches for YOU, and learn the secret to an effective hamstring stretch.
This Free Pain Relief Website
By Clicking On Your Favorite Icon Below:
Add Gary Crowley to your Google Plus Circles -
Google+ (click here)
Copyright © 2011 - 2022 DiyJointPainRelief.com


