Natural Migraine Relief
Just follow along with the videos and soon you'll have the tools to treat your own migraine.
Go directly to any Natural Migraine Relief video on this page by clicking these links:
Intro,
Video 1,
Video 2,
Video 3 .
Pain Relief Success Story, From Jessica:
"Gary I have lived with daily headaches for around 30 years and I am a chronic neck-cracker. I found your video when I had a pinched nerve in my neck. I then went to your site and did the migraine technique. Incredible. Felt my whole head relax. I actually cried - maybe that was part of the release or perhaps I just had hope for the first time in years (having tried osteopaths, acupuncture and the rest). I am coming back to this site again tomorrow and I will keep donating. I love that you also work on dogs. Thank you SO MUCH." Jessica, Melbourne, Australia.
You can do it too!
Click directly to any pain relief video on this page:
Intro,
Video 1,
Video 2,
Video 3 .
*Please Watch This Short Video First. Thanks.
Please visit the techniques page now, if you haven't already.
On the homepage I describe…in detail…the 3 Simple Steps and the 4 Basic Facts about your body that make it possible for you to provide your own joint pain relief.
Detailed Instructions For
Natural Migraine Relief
Click directly to any pain relief video on this page:
Intro, Video 1, Video 2, Video 3 .
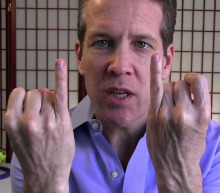
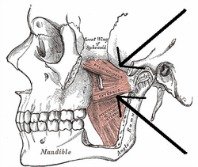
We're going to do the most important muscle for migraine pain relief first, your Lateral Pterygoid Muscle Lateral Pterygoid Muscle.
Here's what we're going to do:
A. You'll want to file down your pinky nail waaaay down so there is basically no nail to press into the tissue at the back of your jaw.
Once you're back there, poke straight back and notice any tight tissue. Poke up at a 45 degree angle and notice any tight tissue. And poke down at about a 45 degree angle and notice any tight tissue.
Next, do a simple press-hold-move technique on any tight tissue you find. Press into the tight tissue, open and close your mouth. Do this with any tight tissue you find.
Make sure and do this on both your left and right lateral pterygoid.
Pay attention to how much migraine pain relief gives you.
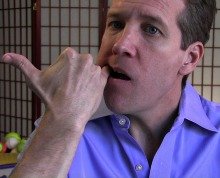
B. Releasing your masseter muscles on both sides of your jaw is what must

A very simple press-hold-move technique gets the job done here.
It's actually rather rare that you can grab both sides of a muscle that you want to work on, but by using your opposite hand you can place your thumb in your mouth to contact the inside surface of your masseter muscle and then with your index finger and middle finger you can contact the outside surface of the muscle.
Next, you just find spots that are painful/tender when you press on them. Clamp down on the tender area with your fingers while you open and close your mouth.
Feel free to do this technique as much as you want. These are big strong hardworking muscles. Any attention you give them will be greatly appreciated.
How much natural migraine pain relief did this technique create?
Click directly to any pain relief video on this page:
Intro,
Video 1,
Video 2,
Video 3 .
Here's what we're going to do:
A. The temporalis muscles lies on the sides of your skull. If you clench and unclench your teeth with your fingertips pressing into to side of your skull you can feel it flex. The press-hold-move technique can be very effective at releasing this muscle. I'd even use the helpful hand-on-hand technique on this very strong muscle to help get just a bit more pressure on any tight tissue you may find.
B. Now we'll release the tissue in your eye sockets and forehead. Using the press-pull-release technique along with the hand-on-hand technique first press with your thumbs into the bone that makes up the top half of your eye socket. Press-pull-release any tender spots. Then take your fingertips and press into the tissue on your forehead, especially directly above your eyes. Press-pull-release any tender spots until they release.
How much natural migraine relief did this technique create?
Click directly to any pain relief video on this page:
Intro,
Video 1,
Video 2,
Video 3 .
Next we'll be working on the top portion of your neck and the bottom of your skull where it meets your neck. The hand-on-hand technique with the press-hold-move technique are very effective in this area.
Here's what we're going to do:
A. It's generally easiest to start with a press-hold-move technique on the base of you skull with your fingertips. Just press into the tissue to find tight areas, and when you find one, nod, twist and turn while you press to get the tissue to release.
When the tight spots stop being painful and tender that means they've released and you can move to another spot.
Some people find that their thumb can work wonders in this area, but others find it difficult, so give it a try and see if you like it.
Move your head in any direction that seems to help the tissue release while you press on it.
And remember that the press-pull-release technique is always an option for those so inclined to give it a try.
How much natural migraine relief did this technique create?
Self-Assessment Of
Natural Migraine Relief Treatment
Which techniques gave you the most migraine pain relief?
Was there one technique that instantly provided migraine pain relief? Remember what worked best for you, so you can do that first next time you need migraine headache relief.
Are you still experiencing some migraine pain?
Which muscles are still tender (that means they are tight!) and could use some more work?
Go back and repeat those techniques that seem to need a few more rounds.
Investigate a bit and you'll eventually find which techniques work best for your individual migraine treatments. Then you'll be able to fix yourself whenever you desire!
Return from this Natural Migraine Relief page to the
Do-It-Yourself Joint Pain Relief Homepage
More Natural Migraine Relief Success, From Wendy
"Thank you so much for all your excellent advice and demonstration videos. I have used your website whenever something hurts! And recommended it to my friends. My biggest thank you is for freedom from migraines. After years of frequent migraines I have only had two (mild) migraines in the past year. It feels like a miracle. I follow your advice every day, most days now I'm free from pain anyway but even if I wake up with that oh so familiar pain started I just follow your self help routine and almost without exception it goes. THANK YOU. I have made a small donation but wanted to add my personal heartfelt thanks." - Wendy C, United Kingdom
This Free Pain Relief Website
By Clicking On Your Favorite Icon Below:
Add Gary Crowley to your Google Plus Circles -
Google+ (click here)
Copyright © 2011 - 2022 DiyJointPainRelief.com


