Shoulder Joint Pain Relief
Learn the self-treatments that will get rid of your pain. The results can occur quite rapidly once you release the right tissue.
Just follow along with the videos.
Go directly to any Shoulder Joint Pain Relief video on this page by clicking these links:
Intro,
Video 1,
Video 2,
Video 3 .
Pain Relief Success Story, From Jags:
"Thank you very much for your very informative site...I have been following your techniques for my shoulder pain, what an improvement! It really DOES work...No more pain killers here....Once again THANK YOU Very Much. God Bless." Jags, United Kingdom
You can do it!
Frozen Shoulder???Frozen Shoulder Exercises and Treatment (click here) for specific do-it-yourself frozen shoulder exercises and treatment.
Click directly to any pain relief video on this page:
Please visit the techniques page now, if you haven't already.
On the homepage I describe…in detail…the 3 Simple Steps and the 4 Basic Facts about your body that make it possible for you to provide your own joint pain relief.
This short introductory video is a great place to start.
Intro,
Video 1,
Video 2,
Video 3 .
Detailed Instructions For
Shoulder Joint Pain Relief
Click directly to any pain relief video on this page:
Intro,
Video 1,
Video 2,
Video 3 .
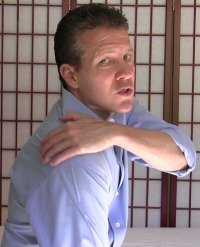
Shoulder joint pain relief can often come, not from pressing on the spot where you feel your shoulder pain, but from releasing the bellies of the muscles that cause the experience of pain where they attach to the bone.
Here's what we are going to do:
A. Top Of Shoulder Release -
The muscle called your supraspinatus sits on the very top of your shoulder blade and runs all the way out to your shoulder and attached to the top of your arm bone (the humerus bone). Releasing this muscle often cures your shoulder pain.
We'll be using the press-hold-move technique.Take the tips of your fingers on your hand from the side of the shoulder that is not experiencing pain and place them on the very top ridge of your shoulder blade, to about an inch over onto your back.
With your fingertips press gently but firmly into the muscle tissue in this area and notice any locations that are painful and/or tender when you apply pressure on them with your fingertips. These are the spots where you have tight tissue that needs to be released.
Next, press firmly into that tight tissue while you raise and lower your arm to make the tissue you are pressing on move a bit while you are pressing on it. Applying pressure on the tissue while you make it move gives your brain the very clear message that you want that tissue to release.
Repeat this process for any tight tissue you find in the area. Feel free to stop for a while if your fingertips get tired. And feel free to leave stubborn spots and return to them after you've released other tight tissue that may help them release more easily.
Notice how effective this technique is in releasing your overall shoulder joint pain.
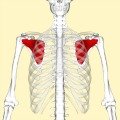
B. Side of Shoulder Release -
Now we need to release your 3 deltoid muscles. And once again we'll use the press-hold-move technique
With your hand from your non-injured side, reach slightly over the back of your shoulder and put your fingertips on the most outer back part of your shoulder - your posterior deltoid. Press on any tender spots on those muscles while you raise and lower your bent injured arm. Now do the same on the side of your shoulder (medial deltoid muscle), while moving your arm in the same way. Now do the same with the front of your shoulder (your anterior deltoid muscle), while moving your arm in the same way. Again, notice how much pain relief you get from this specific technique.
C. Feel free to repeat all of Step 1 again if there is a lot of tight tissue remaining. Or come back later after you've completed all the steps on this page.
Notice the amount of shoulder joint pain relief these techniques provide.
Click directly to any pain relief video on this page:
Intro,
Video 1,
Video 2,
Video 3 .
Sometimes you'll get simple, instant relief from Step 2. Sometimes it's Step 1 or Step 3 that seems to provide more shoulder joint pain relief, but the only way to tell is to do the techniques.
All the nerves that govern your shoulder come from the vertebrae in your lower neck and upper back. We must make sure all the muscles in that area are released and not yanking on a nerve and causing your shoulder pain.
Here's what you're going to do:
A. - Underside of Collarbone -
There are three muscle groups that are located on the underside of your collarbone (subclavius, pectoralis major and minor muscles) that can play a major role in shoulder joint pain.
My favorite way to press on this tissue is by using the hand-on-hand technique. It allows me to get a good amount of gentle pressure without tiring out my hands.
Take a moment and investigate for any tight tissue by pressing into these muscles on the underside of your collarbone.
When you find a tender spot, add the press-pull-release technique. to the "hand-on-hand" method.
Some tissue may be stubborn, but some should let go pretty quickly.
For the really stubborn spots, add the press-hold-move technique to your repertoire. It will usually help on those stubborn spots.
How much pain relief did this technique create?
B. Upper Back -
Releasing the upper back all by yourself can be done effectively and simply by using the press-hold-move technique in combination with the tennis-ball-press technique.
It's pretty straight forward. Either lie on your back with a tennis ball placed under your upper back, or put a tennis ball in a sock that you toss over your shoulder to hold the ball between your upper back and the wall.
From the side of your spine to the tip of your shoulder blade, and from the bottom of your neck down about 6 to 8 inches is the area you'll be working in on BOTH sides.
Simply press the ball into your upper back with your bodyweight and notice where you find tight/painful/tender tissue. When you find a spot, lean into the ball , and then move your arm up and down to make the tissue under the ball move while you still maintain the pressure on it.
Investigate your entire upper back and release any tight areas you find.
How much pain relief did this technique achieve for you?
C. Do your best to release as much of the tight tissue as you can before moving on the Step 3. However, if some spots are just too stubborn to release right now then move on to the next step. You can always come back later.
Please do notice how much shoulder joint pain relief the entirety of Step 2 provides.
Click directly to any pain relief video on this page:
Intro,
Video 1,
Video 2,
Video 3 .
Here's what you're going to do:
A. Side of Shoulder Blade - Working on this one area can often provide instant shoulder joint pain relief. The press-hold-move technique, and the press-pull-release technique can be used effectively in this area. Do them both and see what you like. If you like to do them both then that's great.
Reach your hand across your body and place your fingertips on the outer edge of your shoulder blade. These are your (teres major and minor muscles. Now move your fingertips in an inch toward your ribcage and press into the space between your ribcage and your shoulder blade...this is your subscapularis muscle).
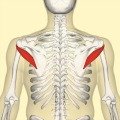
You can sit or lie on the floor. People generally prefer one or the other, but either is fine. Then just do the press-pull-release technique, and the press-hold-move technique by moving your arm. Using both techniques on these muscle groups can be very effective.
Sometimes releasing only these muscle groups can instantly relief your shoulder pain, so do a good job in this area.
And now, assess how much shoulder pain relief this technique provided.
B. Side of Rib Cage -
Your serratus anterior muscle attaches to the underside of the inside edge of your shoulder blade and then comes down and attaches to your ribs. When it's too tight, it can make your shoulder joint hurt.
Take the hand on the same side as the shoulder that hurts and reach across and "hang it" on your opposite shoulder/neck with your finger tips. And now take your other hand and reach around and press into the side of your ribcage just in front of the bottom of your shoulder blade.
With any tight tissue you find in the area use the press-pull-release technique to get it to release. Also try the press-hold-move technique on any tight areas by raising and lowering your bent arm.
Assess how much shoulder pain relief this technique provided.
How much shoulder joint pain relief did the whole of Step 3 provide?
Self-Assessment Of
Shoulder Joint Pain Relief
Was there one specific shoulder joint pain treatment that instantly relieved your pain? Remember what worked best for you, so you can do that first next time you need it.
Are you still experiencing some shoulder joint pain?
Which muscles are still tender (that means they are tight!) and could use some more work?
Investigate a bit and you'll eventually find which techniques work best for you to provide the best shoulder joint pain relief. Then you'll be able to fix yourself whenever you desire!
More Shoulder Joint Pain Relief Pages:
Frozen Shoulder???
Frozen Shoulder Exercises and Treatment (click here) for specific do-it-yourself frozen shoulder exercises and treatment.
Return from this Shoulder Joint Pain Relief page to the
Do-It-Yourself Joint Pain Relief Homepage
More Shoulder Joint Pain Relief Success:
"Just wanted to tell you that my shoulder pain is almost completely healed. I can lean on my hand again after three weeks of pain This is amazing information. The shoulder pain came from a chiropractic adjustment but this technique freed up my shoulder muscles. I didn't realize how many tight muscles I had. I'm now working on the thumb joint pain I have had for years and hoping for good results. I may have some arthritis there now but I'm still going to work on it.. Thanks so much for this great technique." - Dale, United States
"After 10 years of dealing with TMD, migraines, & chronic shoulder pain I recently went to a neurologist who wanted me to do PT twice a week for 12 weeks which I am not able to do at this time. Many times I've googled above issues but tonight I found this site. I can't believe the relief from such simple techniques. So, maybe I'll do my own PT with the techniques I discovered tonight. Thanks for sharing..." - Carie, United States
"...I LOVE your website. I have used your techniques for hip, elbow and neck/shoulder pain with amazing results. I am pain free! Who knew it could be so easy? God bless you and your website. I hope mydonation helps others find your website. I tell everyone I know about it. Thanks,Kelly" - Kelly, United States
"Gary - I can't thank you enough for your videos on how to relieve neck/shoulder pain (haven't tried your other ones, but i'm sure they are just as fantastic)! I have been suffering for weeks now with neck/shoulder/arm pain and was at my wit's end. But after finding your website yesterday and trying your techniques, I am finally finding major relief! Thank you SO very much! You are truly a lifesaver!" - Marsha, United States
This Free Pain Relief Website
By Clicking On Your Favorite Icon Below:
Add Gary Crowley to your Google Plus Circles -
Google+ (click here)
Copyright © 2011 - 2022 DiyJointPainRelief.com


