Pain In Upper Left Back Treatment
Just follow along with the videos.
Don't worry, the techniques are simple. So just go at your own pace, watch the videos, pause and replay as much as you want until you're clear on what to do.
Go directly to any Pain In Upper Left Back video with these links:
Intro,
Video 1,
Video 2,
Video 3,
Video 4 .
Click directly to any pain relief video on this page:
Please visit the techniques page now, if you haven't already.
On the homepage I describe…in detail…the 3 Simple Steps and the 4 Basic Facts about your body that make it possible for you to provide your own joint pain relief.
A. Upper Inner Back -
It's amazing what you can accomplish in terms of pain relief with a tennis ball!
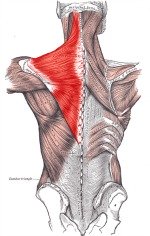
The rhomboid muscle, trapezius muscle, latisimus are three very important muscles in your upper back that often get tight from driving, computing, etc.
But we also do not want to forget about your erector spinae muscles that run vertically along each side of you spinal column. They help support the upper back and maintain integrity in your spinal column.
If you erector spinae get tight they can be like a towel or rag that has been twisted tight. As you can imagine, being twisted like that makes the muscle very strong, so a tight erector spinae can cause many problems.
Because of the location of the erector spinae muscles they can affect the position of verterbrae, the nerve pathways coming out of the vertebrae, the ribs, and all the other muscle groups in the area. Thus, to say the least, it's important to make sure your erector spinae muscles are free and functional.
We are going to use the tennis-ball-press technique in the area between your spine and shoulder blade on each side to free any of those tight muscles.
Once the tennis ball is pressed into some tight tissue, use the press-hold-move technique to get it to release. Generally, moving your arm up and down will do the trick.
Pain in upper left back assessment - notice results this produces.
B. Upper Middle Back -
Primarily we'll be aiming to release your rhomboid muscle and your middle trapezius muscle. These muscles will often "hurt so good" when you press on them if they're tight. They can take a bit of time to release. I wouldn't say they are stubborn, but they are strong muscles and you are working through some layers of tissue, so it make take a bit of time get the whole area free.
The nice thing is that if you open up this area, then it can dramatically affect your entire shoulder girdle and neck in some people. If are hunched over a desk all day long or sitting in front of a computer for hours on end, then these might be key muscles for you to work on.
Use the same technique as in Step A to release the tissue in your upper middle back by using a ball to create pressure on the tissue with you moving your arm at the same time.
Pain in upper left back assessment - how well did this technique work?.
C. Upper Outer Back -
The infraspinatus muscle, your outer upper back, is where we'll work next. This muscle can get very tight in people who use laptop computers without separate keyboards. Because you have to "reach" with your arms more on a laptop because the keyboard is not separate, it puts a great deal of stress on this infraspinatus muscle.
If this is a regular issue for you then you might consider buying a separate keyboard for your computer. That said, even those who sit at a regular computer can have issues here if there keyboard is to high and/or too far away. So making an effort to always make sure your keyboard is low and close can be energy well spent.
The tennis-ball-press technique with the press-hold-move technique are used once again, just like in the above techniques.
Pain in upper left back assessment - notice the amount of upper left back pain relief this provided.
Here's what we're going to do:
A.Underside of Collarbone -
This short introductory video is a great place to start.
Intro,
Video 1,
Video 2,
Video 3,
Video 4 .
Detailed Instructions For Pain In Upper Left Back Treatment
Click directly to any pain relief video on this page:
Intro,
Video 1,
Video 2,
Video 3,
Video 4 .
Here's what we are going to do:
Click directly to any pain relief video on this page:
Intro,
Video 1,
Video 2,
Video 3,
Video 4 .
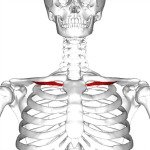
(muscle groups: pectorals major, pectorals minor, subclavius)
Pain in upper left back sometimes results from tight muscles chest yanking on your ribs and shoulder blade.
Pain in upper left back assessment - how well did this technique work for you?
The press-hold-move technique can also be used here by moving your arm while you press on the tight tissue.
B.Pectoralis Major and Edge of Sternum -
Now, using the same techniques you just used on the underside of your collarbone, come down from your collar bone and press into your chest muscle (pectorals major) and notice any tender/painful spots. Again, do the press-pull-release and the press-hold-move to release any of the tight tissue you find.
Also, make sure and check the edge of your sternum (the big bone that runs down the center of your chest) where the ribs attach and your pectoralis major attaches. Do the same techniques mentioned just above to release any inappropriately tight (and therefore, painful when you press on it) tissue.
Pain in upper left back assessment - how well did this technique work for you?
Click directly to any pain relief video on this page:
Intro,
Video 1,
Video 2,
Video 3,
Video 4 .
(muscle groups: teres major, teres minor, subscapularis, serratus anterior)
Here's what we're going to do:
A. Side of Shoulder Blade (teres major, teres minor, subscapularis) -
Using the press-hold-move technique find and release any tight tissue you find by pressing on the tissue while you "flap" your arm.
This area can be difficult for some individuals to work on, since you've got to reach all the way across your body, while simultaneously finding and releasing tight muscle tissue. So I recommend that you do a little bit at a time if that's all you can manage. You can always take a break and return later to do some more work.
Also, please know it is okay to try these techniques lying on your side. Some individuals prefer this position. I do not, but I've gotten many emails from people who do.
And always keep in mind that you can recruit friends and family to do some work on you in the areas you have a difficult time releasing. You may owe them a favor, but it could also be well worth it.
Pain in upper left back assessment - how well did this technique work for you?
B. Side of Rib Cage (serratus anterior) -
In a seated or lying position, use the press-pull-release technique to find, work on, and release any tight tissue in the area.
This area is similar the Step A in that it can be difficult for some people to reach all the ways across their chest and not only reach this area, but also to work on it. As above, take breaks, try different positions to see what might work better. And recruit those friends and family if you can to get into those tricky places. You can coach them a bit to do what you've learned.
Pain in upper left back assessment - how much upper left back pain relief did this provide.
You can also do the press-hold-move technique by pressing on the tissue and raising and lower your arm. It can only help!
Click directly to any pain relief video on this page:
Intro,
Video 1,
Video 2,
Video 3,
Video 4 .
(muscle groups: upper trapezius, upper erector spinae, supraspinatus, levator scapulae)
Here's what we're going to do:
A. Upper Neck Release -
Use the hand-on-hand technique to apply the extra pressure that will help release the tight tissue.
Press into the tissue at the top of your neck and base of your skull and notice any tender areas. Some people find it easier to lie on the floor when they do this, so the weight of your head can help you press into the tissue.
Now pick one of the tender spots, one at a time, and press on the tissue with your fingertips, while your other hand pressing on your finger tips to add more pressure. As you do this, move your head in a "yes" motion for a few nods, a "No" motion for a few turns. Keep pressing on the tender spots and moving your head in the way where you feel the tenderness until in releases. We call this the press-hold-move technique.
Take your time. Be patient. After a minute or two take a break. Then repeat if there is more to do.
Pain in upper left back assessment - how well did this technique work for you?
You can also add the press-pull-release technique to any particualurly stubborn spots if you desire.
B. Lower Neck Release -
Using the same hand-on-hand techniquedescribed above now press on the tissue all the way down the rest of the back of your neck and notice any tender spots. Make sure to press on the tissue an inch or two away from your vertebrae,and also the tissue next to your vertebrae, since all those muscle bellies are important to begin to release.
Now, using the Hand-On-Hand technique, do the press-hold-move technique with the same "yes" and "no" head motions as before, press on any tight tissue using the method while moving your head. Do this for a minute or two…pressing on different spots for a few seconds or more before taking a break.
How much upper left back pain relief did this provide.
C. Neck/Shoulder/Back Intersection Release
Take your hand and hang it over the area where your neck, shoulder, and upper back all come together. Press into the muscle tissue in the area from the very top of your shoulder down about 3 inches or so down onto your upper back, and 4 to 5 inches out from your neck. Notice any tender spots.
Now press on one tender spot at a time while you do the press-hold-move technique by rotating your arm and shoulder so you feel the tissue move under your fingertips.
Pain in upper left back assessment - how much upper left back pain relief did this provide?
Adding the press-pull-release technique to any particularly stubborn spots if you desire is also a good use of your time.
Self-Assessment For
Pain In Upper Left Back Treatment
Did you notice a certain technique that made a dramatic difference?
Are there any areas of tight tissue that you need to return to and work on further?
Make a note now of the areas you really want to focus on when you work on yourself again.
Take the time to actually write down your insights from the above analysis, so you'll be able to get the best, and fastest results the next time you work on yourself.
Return from this Pain In Upper Left Back Pain page to the
Do-It-Yourself Joint Pain Relief Homepage
To visit the main Upper Back Pain Relief page (click here)
The Massage Tool Release For Upper Back page shows a great technique to add to your upper back pain relief program.
Pain In Upper Left Back Pain Relief Stories:
"thanks gary I am a firm believer in not taking pills for pain ,as a cyclist and thai boxing and train about 15 hrs plus a week, and I am hitting 46 yrs old these videos are a god send you helped me a lot..." - Steve, United Kingdom
"omg dude this is legit, thanks man" - Sean, United States
"Thank you so much! Your instruction is simple and right on spot for all the different problems. I have been watching all you video's and they are terrific. Thanks for taking the time to help so many people who will watch your instructional advise Kudos to you.... " - Kelly, Country Unknown
"This is awesome. I only had a squash ball handy, but it worked great it really conforms to your muscles and springs right back to the shape of a ball after you release pressure. I was going to book a massage but this is quicker and cheaper!" - Harold, Country Unknown
"Hi Gary, thanks you so much!! You saved me today.I realized the pain on my way back from office. Later at night it really became bad and my wife found your video. I spent a few minutes doing what you showed and now feel much better. Regards, arnab" - Arnab, Country Unknown
This Free Pain Relief Website
By Clicking On Your Favorite Icon Below:
Add Gary Crowley to your Google Plus Circles -
Google+ (click here)
Copyright © 2011 - 2022 DiyJointPainRelief.com


