Guitar Tendonitis Treatment -
A Quick Fix
The repetitive motion of playing the guitar tightens certain muscle groups. Those tight muscles are most likely the cause of your pain, so they need to be released.
The videos on this page will show you how to provide your own pain relief and how to do it. Just follow along.
Go directly to any Guitar Tendonitis Treatment video on this page with these links:
Intro,
Video 1,
Video 2.
Click directly to any pain relief video on this page:
Please visit the techniques page now, if you haven't already.
On the homepage I describe…in detail…the 3 Simple Steps and the 4 Basic Facts about your body that make it possible for you to provide your own joint pain relief.
This short introductory video is a great place to start.
Intro,
Video 1,
Video 2,.
Detailed Instructions For
Guitar Tendonitis Treatment
Click directly to any pain relief video on this page:
Intro,
Video 1,
Video 2,.
The Most Important Thing
I would like you to get from these guitar tendonitis videos is that, in 99 cases out of 100, you can fix yourself. AND that if you are a serious guitar player, with just a little maintenance using my techniques, you can practice as much as you want without worrying about your guitar tendonitis becoming an issue that prevents you playing.
Here's what we cover in Video 1:
First, the cause of your guitar tendonitis is most often just tight muscles that have gotten tight from the repetitive motion of playing the guitar. When muscles get used a lot in the same way they tend to get tight. When they get tight, the tendons that attach the muscles to the bones get pulled on and often become painful and inflamed.
You can certainly help bring down the inflammation by icing the area or by taking a break from playing, BUT that doesn't undo the cause of your problem.
In order to undo the cause of your problem, you have to release the tight muscle tissue that is yanking of the tendons and the tendon's attachment on the bones. The way to do that is by using the press-pull-release technique and the press-hold-move technique
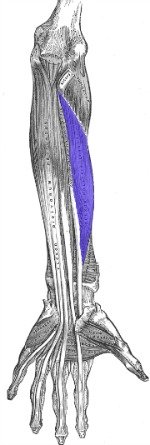
Here in Video 1 we focus on the forearm muscles whose long tendons reach all the way down the the forearm, through the wrist, and into the palm of the hand. Releasing these muscle groups will usually do a great deal to relieve any wrist tendonitis you have.
You can use your thumb to do the above techniques, and also use your opposite forearm. And if you are fortunate enough to have a friend who will press both their thumbs into your forearm while you open and close your hand, and/or flex your wrist up and down then that's great to.
Click directly to any pain relief video on this page:
Intro,
Video 1,
Video 2,.
It's always good to release your forearm muscles like we did in Video 1, so hopefully you're already feeling better.
In Video 2, here's what we're going to do:
First, we'll be using the very same press-pull-release technique and press-hold-move technique in order to release any tight tissue.
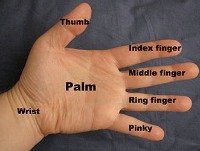
When it comes to your thumb, it's very important to release the little thumb muscles in your forearm. Just up from your thumb on either side of the bone in your forearm you'll feel the muscles you need to release when you move your thumb back and forth, up and down while you press your fingertips and opposite thumb into this area. After releasing the forearm muscles that help your thumb to function, you'll next want to work on the thumb muscles that we often call the thumb pad. Move your thumb up and down, back and forth as find the muscles that are tight. Release them with the same techniques you've been using.
Second, we want to work on your fingers. If we were starting from scratch, I'd have you work in your forearm first, then work in the palm of your hand releasing any tight tissue, and then finally get to the fingers.
Basically, you'll just work in tight muscles you'll find in the palm of your hand and in your fingers by using the press-pull-release technique and press-hold-move technique that you've been using since Video 1.
Additional Guitar Tendonitis Pages
Wrist Pain Relief
Wrist Pain Relief - the main wrist pain relief page where you are shown the 3 Simple Steps to relieve your wrist pain.
Hand Pain Relief
Hand Pain Relief - the main hand pain relief page where you are shown the 3 Simple Steps to relieve your hand pain.
Finger Joint Pain Relief
Finger Joint Pain Relief - the main finger joint pain relief page where you are shown the 3 Simple Steps to relieve your finger joint pain.
Thumb Joint Pain Relief
Thumb Joint Pain - the main thumb joint pain relief page where you are shown the 3 Simple Steps to relieve your thumb joint pain.
Self-Assessment Of
Guitar Tendonitis Treatment
Was there one treatment that stood out as "best for you"?
Is there any one technique you would want to do on a regular basis?
Where were you particularly tight?
Was there one particular guitar tendonitis treatment that accessed that tight spot particularly well?
Was there a manual release technique that released your tight areas particularly well?
Remember(!) what worked best for you, so you can do that first next time you need it.
Which muscles are still tender (that means they are too tight!) and could use some more work?
Go back and repeat those techniques that seem to need a few more rounds. You may be pleasantly surprised at the results you get now that you've released other muscles that may prevented them letting go on the first attempt.
Investigate a bit and you'll eventually find which techniques work best for you to provide the best release of your calves. Then you'll be able to fix yourself whenever you want.
Return from this Guitar Tendonitis Treatment page to the
Do-It-Yourself Joint Pain Relief Homepage
This Free Pain Relief Website
By Clicking On Your Favorite Icon Below:
Add Gary Crowley to your Google Plus Circles -
Google+ (click here)
Copyright © 2011 - 2022 DiyJointPainRelief.com


